17
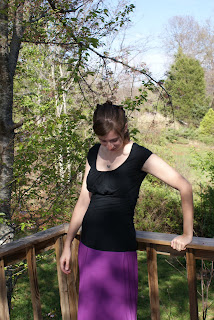
2010Here’s Spring Top number 1: My Purple Ruffle Shoulder Top
A little secret: this used to be an Old Navy maxi dress that I wore throughout my entire twin pregnancy. The tummy was a little stretched out (and a lot stained…ahem) and I didn’t think I’d wear again. Here’s a little view of the dress in it’s former maternity life:
I started with the Chickadee pattern on BurdaStyle for the cute sleeve shape and a block for doing raglan type top. I added width in the middle front and gathered it into the neckline binding. I used the pre-existing hem on the dress and gave it a kind of straight flowy fit. Then I gathered some 1 1/2″ strips and pinned them on the left shoulder in a fun swirly arrangement.
I wore this top all day and went shopping with the girlies at Target, hung diapers on the line, and all the normal daily stuff with the girls too. I love how cool it was in this super warm weather. I think the purple ruffle top will quickly become a favorite and happy for the challenge to make it. Thanks, Rae 🙂

16
2010- I don’t have many summery tops that that fit my nursing figure… if you catch my drift 😉
- I have quite a few fabrics leftover from my Maternity Sewing Project.
- I’m kind of liking this ruffly trend and have been introduced to the world of Antropologie. Coveting might be my new sin new issue… if I couldn’t just as easily make Antrocopies 🙂
- Even though God has more than provided for our needs and we’re no longer praying daily for provision, I don’t really have money to spend on clothing. (We’re trying to pay off our last debt besides the mortgage and redecorate a room at a time. The girls/guest bathroom is next up… I’m so excited.)
10
2010This blog that started mostly as a crafting blog has evolved into a twins and dairy-free eating blog with a huge side dish of thanksgiving (not the holiday, silly, the verb). It’s slightly schizophrenic, but I don’t mind too much since the chaotic variety is a good representation of my day to day life.
But in any case on this blog it seams like I haven’t touched the crafty side of my life in months. I’d been working on a couple commissioned quilts for my college hall mate since about 3 weeks after the girls arrived. I vowed that I wouldn’t work on anything else until they were finished. A couple weeks ago I fought through the sleep deprivation and procrastination and finished them. Whew!
My next project started when I met a sweet momma named Ashley on the tile aisle of Home Depot and we bonded instantly over cloth diapers (I promise I couldn’t make this up). The girls and I were able to hang out later with her sweet daughter Claudia. Ashley was just learning to make her own cloth diapers and I thought: Surely, I could sew a diaper and the 36 diapers I currently have just aren’t enough. Here they are:
I made them with the Tighty Whity Hipster Pattern from Little Comet Tails and, though I mastered the fit on the second diaper, I learned a few very important lessons.
- It’s better to top stitch your pretty outer fabric to your inner waterproof PUL and then sew the diaper up so that only the PUL and inner layers touch directly around the legs. (Directions for putting a cute outer fabric on a PUL diaper the proper way are found here). Otherwise, as soon as your sweet girly wets the diaper it will wick straight to your outer layer. This my friends was a fun lesson to learn (sarcasm).
- For my skinny girls with somewhat chunky thighs, high rises, and itty bitty little waists, the velcro or snaps must go all the way across the diaper middle. It fit their legs but wouldn’t close small enough around the tummies.
- Most importantly: Velcro that you can buy at the store is not the same as the Aplix used on purchased cloth diapers. Nope… they are different creatures altogether. A diaper made with Velcro… well it won’t make it through the wash 😉
Oh well. I’ll order some Aplix soon and give it another try, but for now I have other crafty plans to attend to…
25
2009Merry Christmas to you! I hope you are enjoying the best Gift of this season: the Love of Christ!
My husband and I are still busy paying off our Buy One Get One Free baby special, so Christmas this year had to be highly budgeted. I got a little creative with gifts and we only spent $63 dollars on 7 people.
My dad and Derek’s parents received a 20 page 5 by 7 photo brag book of the twin’s first three months from Shutterfly. These were buy one, get one half off.
I bought my mom a fancy garlic press (she wanted one) and made her a wallet set using stash fabric, zipper, and a snap.
A coin purse. I just stitched some rectangles to a 3″ stash zipper. This was the hardest of the three and I’m still not happy with it. It would have been easier if I could find my missing zipper foot (so frustrated!) Live and learn!
For my sister, I machine quilted her Amy Butler Obsession Quilt and bound it. I’ve never done such extensive quilting and I’m super happy with it, especially the fun variegated lines in the navy blue border. My sister wasn’t upset that we couldn’t find matching cotton teal for that border so I had fun spicing up the plain navy.
Since my sister purchased all the fabric for her quilt and even sewed together the top, I decided I’d make her a cute bag and wallet too.
Rae’s Gorgeous Buttercup Bag Pattern (I’m considering reopening my Etsy shop just to sell these. Would you buy one? I love it!)
The wallet uses her quilt backing and bag lining fabric and was a fun little project!
Aeralind and Bronwyn received a set of three hanging teething toys. I’m also going to make them a pair of hand embroidered baby dedication gowns. That deadline is quickly approaching, so I had better get started!
01
2009My sister Monica came up to assist me with the girls, but while she was here she wanted quilting lessons. I was overjoyed to oblige 😀 I took her to a local shop where we spent hours picking out fabric(or so it seemed…though it was less time than it took us to pick out bedroom paint colors!) . Monica LOVES large modern patterns and was practically drooling over the Amy Butler lines Bella and Daisy Chain.
We wanted her first quilt to be simple so we cut out 5″ squares from 6 different fat quarters. Monica arranged them on a diagonal stripe and we went to work. The borders are cream and navy. We finished the top while she was here and I’m going to quilt and bind. I get to use my brand new walking foot (a gift from my hubby)! It may take me the rest of the year to finish…


