22
2013Now that we know how a camera works in an oversimplified way, lets learn about the different camera types. If you’re a photographer/crazy gear nut, please overlook my gross oversimplification. I’m trying not to scare the newbies off! (Graphics are credited to this site)
Not including our pinhole camera :-p, there are three basic camera types: point and shoot, SLR, and SLT/mirrorless. I’m going to give you a quick explanation of each camera type. Then, we’ll explore the pros and cons the camera types.
Camera Types
Point and Shoot
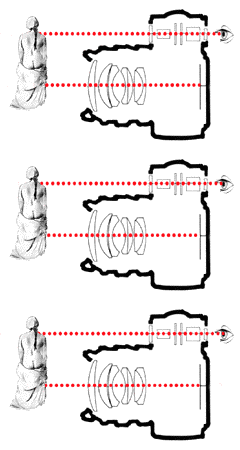
In a point and shoot, what you see in the viewfinder isn’t exactly what will be captured.
Back in the film days, these were known as rangefinders. In a point and shoot, when you look through the view finder (or lcd screen) you’re not seeing exactly what’s going to be shot through the lens. You are instead looking through something like the peep hole in hotel doors. Therefore you’re seeing something in close range to what will be shoot. Rangefinder, got it? This not seeing exactly what you’re shooting is called Parallax Error (a piece of information suitable for trivial pursuit…ahem). What you really need to know is that the closer you are to your subject, the worse that error will be. You might cut off the tops of heads or other such detail. You need to be aware of this Parallax Error if you’re shooting with a point and shoot and learn to compensate when needed.
Pros of a Point and Shoot
- Inexpensive- or a price range for everyone
- Lightweight
- Super Portable (fits in a pocket or purse)
- May be embedded in your cell phone 😉
- Usually has a visual dial/menu listing of different settings (a moon for night photography, a face for portraits, a mountain for landscapes)
- Typically has a pop-up flash (and this can be a con if you use it too close or have your subject too close to a wall…)
Cons of a Point and Shoot
- Parallax Error (explained above)
- Slow response time. When you press the shutter release button and there’s a delay of around 1-5 seconds before the image is taken. This is frustrating when capturing children or sports.
- Usually can’t change lenses
- Zoom feature is often digital which means images can get pixel-y/grainy.
- Most don’t allow for full manual control.
Single Lens Reflex (SLR)
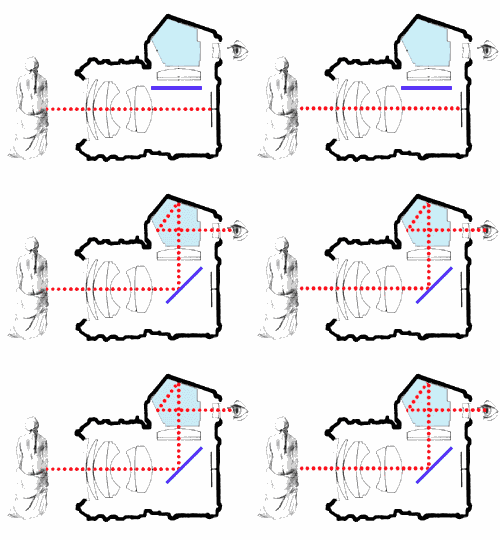
SLR cameras allow you to see the exact image that will be taken through the use of a mirror.
The Single Lens Reflex (SLR) is the type of camera you envision your professional photographer using. It’s got the fancy detachable lenses, lots of crazy settings, and it makes that satisfying click when you press the shutter release button. The click is a mirror snapping up and out of the way of the recording medium (film or your digital sensor). In the image above the mirror is the dark blue thing. The light blue area is a prism that turns the image back right side up so we’re not all confused in the optical viewfinder. In an SLR the photographer sees exactly the shot they are about to take.
Pros of the Single Lens Reflex
- Price ranges from fairly inexpensive ($200+ for used or older varieties) to extremely expensive (over $3000) depending on features and sensor size.
- With the mirror, you’re seeing exactly the spot you’re photographing
- You can manually adjust all of your settings even on the most inexpensive variety. This means you have full creative control!
- Hardly any lag time between pressing the shutter release button and the taking of the image. You don’t have to anticipate what your crazy kiddos are about to do before taking the shot; you’ll capture the moment you see or a mere 100th of a second afterward.
- Interchangeable lenses.
- Zoom is mechanical in the lenses rather than digital meaning the image quality is not reduced when zooming in.
Cons
- Heavy
- Isn’t as portable as a Point and Shoot. Likely won’t fit in your purse or back pocket. :-p
- May not come with a built in flash (again… not necessarily a bad thing)
- Good lenses can be pricey; sometimes even more expensive than your camera body itself.
- Takes a while to learn to use well. It isn’t as fool proof as a point and shoot.
- Optical viewfinder may be a bit dark.
Mirrorless Cameras or Single Lens Translucent
Mirrorless Cameras (or SLTs as Sony calls them) are the newest technology out there. You’re still looking through the lens like in an SLR except there’s no mirror. You’re literally gazing at what the sensor sees. This isn’t possible in film cameras. This also means that your viewfinder isn’t optical (a piece of glass); it’s typically tiny LCD screen. Mirrorless Camera’s can look very much like a point and shoot or just like an SLR (just without the mirror click!). Even the ones that look like a point and shoot typically have interchangeable lenses, just like an SLR.
Pros of Mirrorless Cameras
- No lag time at all between pressing the shutter and taking an image. Most of them even allow for continuous shooting (taking up to 10 images in rapid succession)
- Electronic viewfinder shows the scene exactly as the camera sees it. This is a lot different than the optical/LCD viewfinder of Point and Shoot or SLR cameras. You’re not seeing the scene as the naked eye sees it; instead, you’re seeing the exact thing that will be recorded. (Some people find this electronic viewfinder a con.)
- You can manually adjust all settings even on the varieties that look like point and shoots.
- Interchangeable lenses
- Zoom is mechanical in the lenses rather than digital meaning the image quality is not reduced when zooming in.
- Some are as portable as the Point and Shoots and have interchangeable lenses too!
Cons of Mirrorless Cameras
- Expensive! New technology comes with a price. Even the cheapest one is going to run you about $500.
- The electronic viewfinder actually draws some light away from the sensor. This mostly isn’t noticeable unless you’re shooting in darker conditions.
- Some are heavy.
- The more traditional SLR body types are not so portable.
- May not come with a built in flash (again… not necessarily a bad thing)
- Good lenses can be pricey; sometimes even more expensive than your camera body itself.
- Takes a while to learn to use well. It isn’t as fool proof as a point and shoot.
Mini Homework
Figure out what camera type you’re using! It might take a little Google work, but it shouldn’t take long!
Just because I know someone is going to ask: I use a Digital SLR, a Sony a200. It’s an entry level camera from about four years ago. I have my eye set on upgrading to Sony’s a77 SLT, but my policy is no debt so it might take me over a year to save that much and by then the full frame a99 might have come down enough in price for me to snatch it up used. 🙂 In my spare time and when I have darkroom chemicals on hand, I shoot a Canon A-1 film SLR which I still love to bits 🙂
Did you learn anything about camera types in this post? Have any ah-ha moments about why your camera does that thing that drives you nuts? Let me know in the comments!
Next week we’ll be ready to enjoy and critique your favorite images, so start sorting and editing (if applicable). I’ll be posting both my straight out of the camera shots (SOOC) and my final edits of some of my recent sessions for you to see and critique as well as hosting a link up. I can’t wait to see what you love!
15
2013Why do I Need to Know How Cameras Work?
I can already see you scowling at the screen. “Seriously? I was hoping you were going to show me how to make beautiful pictures! I don’t care how cameras work !” Don’t click away yet!
Knowing how cameras work will help you understand how to make better images. When you understand what your gear is doing, you know how to use it to create the image you want.
Don’t worry, I’m not going to bore you with unnecessary details about megapixels or 35mm film or image resolution (these are things I still barely understand!). So lets dive in together, shall we?
What is THAT?!

This is a pinhole camera. If you distill a camera down to it’s simplest form, you’ll get what you see above. You can make a camera out of a box, or a can, or an oatmeal container. It just needs to be light-tight except for that tiny pinhole and have some light sensitive material to record the image.
How Cameras Work
We’re going to grossly oversimplify this so I don’t lose you. Below is a diagram of a camera and a quick bullet list defining all the parts.
- Light: I know, technically not part of the camera; however, it’s essential to the process so humor me! When you make an image, you are recording the reflection of light. Colors reflect light differently. Black gobbles up light completely, white reflects it all back, and the rest of the colors do something in between. Your camera’s job is to capture reflected light.
- Enclosure: Your camera’s body. The cardboard box in the pinhole camera above. Your camera enclosure is probably a nice little plastic or metal thingy with a variety of buttons, screens, and a viewfinder. The main purpose of the enclosure, outside of giving you something to hold, is to keep all light out! Any light leaking through the enclosure will make capturing an accurate image nearly impossible.
- Lens: The thing that focuses the light on your recording medium. Our pinhole camera doesn’t technically have a lens. But your camera probably does. Whether it’s detachable or not depends on the type of camera.
Lens come in a variety of focal lengths; they can be wide (so you can see the whole mountain range) or telephoto (so you can stand on the sidelines and capture the game). They can be fixed/prime (only do one thing: wide, or telephoto) or zoom (switch between the two). Camera users can switch lenses or use different focal lengths for different effects. - Aperture: The hole that lets in the light. The pinhole camera’s pin hole (literally… pin sized) lets in very little light but creates an image where everything is equally in focus across fore, mid, and back grounds. Our cameras have much larger aperture holes and therefore do not focus equally in all parts of the image. This is going to be a key concept later! Aperture is generally in a part of your lens referred to as the aperture ring.
- Shutter: The Shutter is the screen covering your recording medium until you are ready to take your image. See that piece of square tape in the middle of the pinhole camera, that’s the shutter. Your camera shutter is internal. That button you press is called the Shutter Release and it causes the shutter to move out of the way. Camera users can change how quickly the shutter.
- Recording Medium: This is what records your image so you can view it later. With the pinhole camera, it’s most likely a piece of film. With digital cameras, it’s a light sensitive sensor. The size of your recording medium (both film and sensors) directly effects the detail quality of your image. The larger your recording medium, the more detail you’ll see in your final print.
Additionally, recording mediums are like skin: some sunburn in 30 minutes and others take 5 hours to even tan up a bit. You don’t want to use a recording medium that sunburns easily on a bright day nor do you want to use one that takes hours to tan up when you’re working with less light. This speed of recording light is called ISO.
Why all This Matters?
There’s two things you can’t change when you press your shutter release button: the enclosure of your camera and the light reflected from your scene (although you can modify/control the light with flash or location change). But there are 4 things that you can change, usually with a click of a few dials or a quick lens change.
When you know how cameras work, you can begin to understand how and why to change lens, aperture, shutter speed, and recording medium (ISO) to get the results you want.
Mini Homework
This is probably the simplest and most annoying homework you’re going to get. You’re really going to hate me for this and I’m likely going to repeat this mini homework a few times.
READ YOUR CAMERA’S MANUAL! Maybe not the whole thing… because that’s probably more than you want to bite off at one time. We’ll be doing a lot of camera manual browsing throughout this course and each time it will be more in-depth and specific.
This time through your manual, I want to you find sections that tell you how to zoom or change your lens (if applicable), change your aperture, change your shutter speed, and change your ISO. But don’t just read. Depending on your learning style you might want to highlight these sections with different colored markers. You might want to YouTube your camera model and see if you can watch someone else change these things up. You might want to pull out your camera and practice toggling those buttons. You might want to dive in and just play with those settings and see what happens. Do whatever it takes for you to get a feel for the vocabulary introduced above.
If you have any questions please, jot them down in the comment section below. No question is stupid. We’re all here to learn. I’ll do my best to answer each of them. However, this week might have a lot of “We’ll get to that in a different lesson.” type replies. When I post on that topic, I’ll try to come back and link you to that post.
08
2013Learn to Critique Photos
Here in the beginning of this series there’s going to be a pile of super informative posts. It’s a necessary evil. Without knowing about your camera and why it does what it does, you’re not able to utilize it to the fullest. But I don’t want you to just be sitting here absorbing all this information and not practicing and growing. So while I’m preparing a post on how cameras work and the types of cameras out there, we’re going to learn to critique photos. Starting with self-critique.
Critique sort of gives me the heebie jeebies. You know the kind of feeling where even the most powerful antiperspirant in the universe will not be any aid to you whatsoever. Oh, wait… maybe I’m the only one who sweats like a marathon runner in these situations. I digress. Ahem.
No matter how much we fear critique, we must understand that constructive criticism is the quickest road to growth. I know that when my loving friends point out sin in my life, not only do I recognize my error faster, but I’m able to identify both the cause and the solution relatively quickly with their help. This same process occurs in photography critique.
When you can clearly state what you like about a photograph, clearly state what could be improved in a photograph, and give clear suggestions for improvement (whether on your own photo or on someone else’s photo), you’re able to improve each shot you take. Additionally, recognizing what you love about each photograph will help you develop a consistent style.
Assignment #1
So here’s your mission possible. Over the next three weeks, I want you to pull out your camera and use it for 5-10 minutes each day. Take photos of whatever your heart desires. Flowers, trees, tickle fights with your kiddos, sleeping babies, your sink full of dirty dishes, your sister’s jewelry collection. The sky is the limit! (really… some images of the sky might be rocking awesome and very challenging to capture). Record whatever it is you love to photograph most.
On the last few days in this three week period, I want you to pick 5-10 images that are your very favorite. You can edit if you’re familiar with editing or just leave them straight out of the camera (SOOC). Pick the images that make your soul sing and slap them into a blog post (or Flikr album for those of you who may not blog). Get them in chronological order of the date/time they were taken. You might find that all your images were shot on the same day and are part of a story. You may find that your images are vastly different, some dark and moody with others whimsical and ethereal. That’s totally okay. Just pick your favorites.
Under each picture write a sentence or two about what you love most about that image. Was it the way the sun light just seems so warm and inviting? Was it the emotion captured? Was it an emotion that your image evoked in you? Was it the way your eye feels drawn to some part of the image that you might not have even noticed when you clicked the shutter?
Now take a deep breath, put on a good coat of your favorite antiperspirant, and look at those photos with a critical eye. Is your focus sharp? Do the colors seem funky and maybe too orange or too blue? Is there something distracting in the background? Do you wish your subjects were in a different part of the frame? Is the image darker than your eye saw it? Is the image too light? Is your subject squinting? Does it look like a tree branch is growing out of your subjects head? Did you over edit a certain area (if you are able to ice skate on your subjects sparkling eyes… you might have over sharpened)?
The Oreo Cookie when you Learn to Critique Photos
I’m a firm believer that when you critique anyone on anything you need to make an Oreo cookie. Good, not so good, and good. Hearing just the bad doesn’t always motivate me to change. Hearing only the bad might make me angry or resentful. I might feel hurt or hopeless that I could ever change. But hearing good, not so good, and good again, lets me know that the person giving the critique cares for me, sees an area of needing growth, and also recognizes my efforts. I feel both humbled and encouraged.
After you’ve told us why the photo is your favorite and recognized areas that might need growth, I want you to go back and look for the good. Compare the photo to ones you took earlier in the three weeks. Did your skills grow? How? Did you manage to freeze the action of that tickle fight where you hadn’t managed to before? Did you blur out what might have been a distracting background? Did you apply something you had just learned while completing the mini homework from the two Friday articles? What else makes this photograph good?
Turning in your Assignment
On Tuesday January 29th, 2013, I want you to be super brave and click publish on this blog post or Flikr album. I’m going to host a link up here so we can all view each other’s work. You’ll be instructed to visit the sites of the two people before you and pick one of their images to practice giving constructive criticism to another person. Don’t skip this step! First, commenting on someone’s post is going to help build this community. Second, practicing critique is going to help you look at a photo beyond the initial emotional impact. Third, openly receiving someone’s critique is the quickest way to grow.
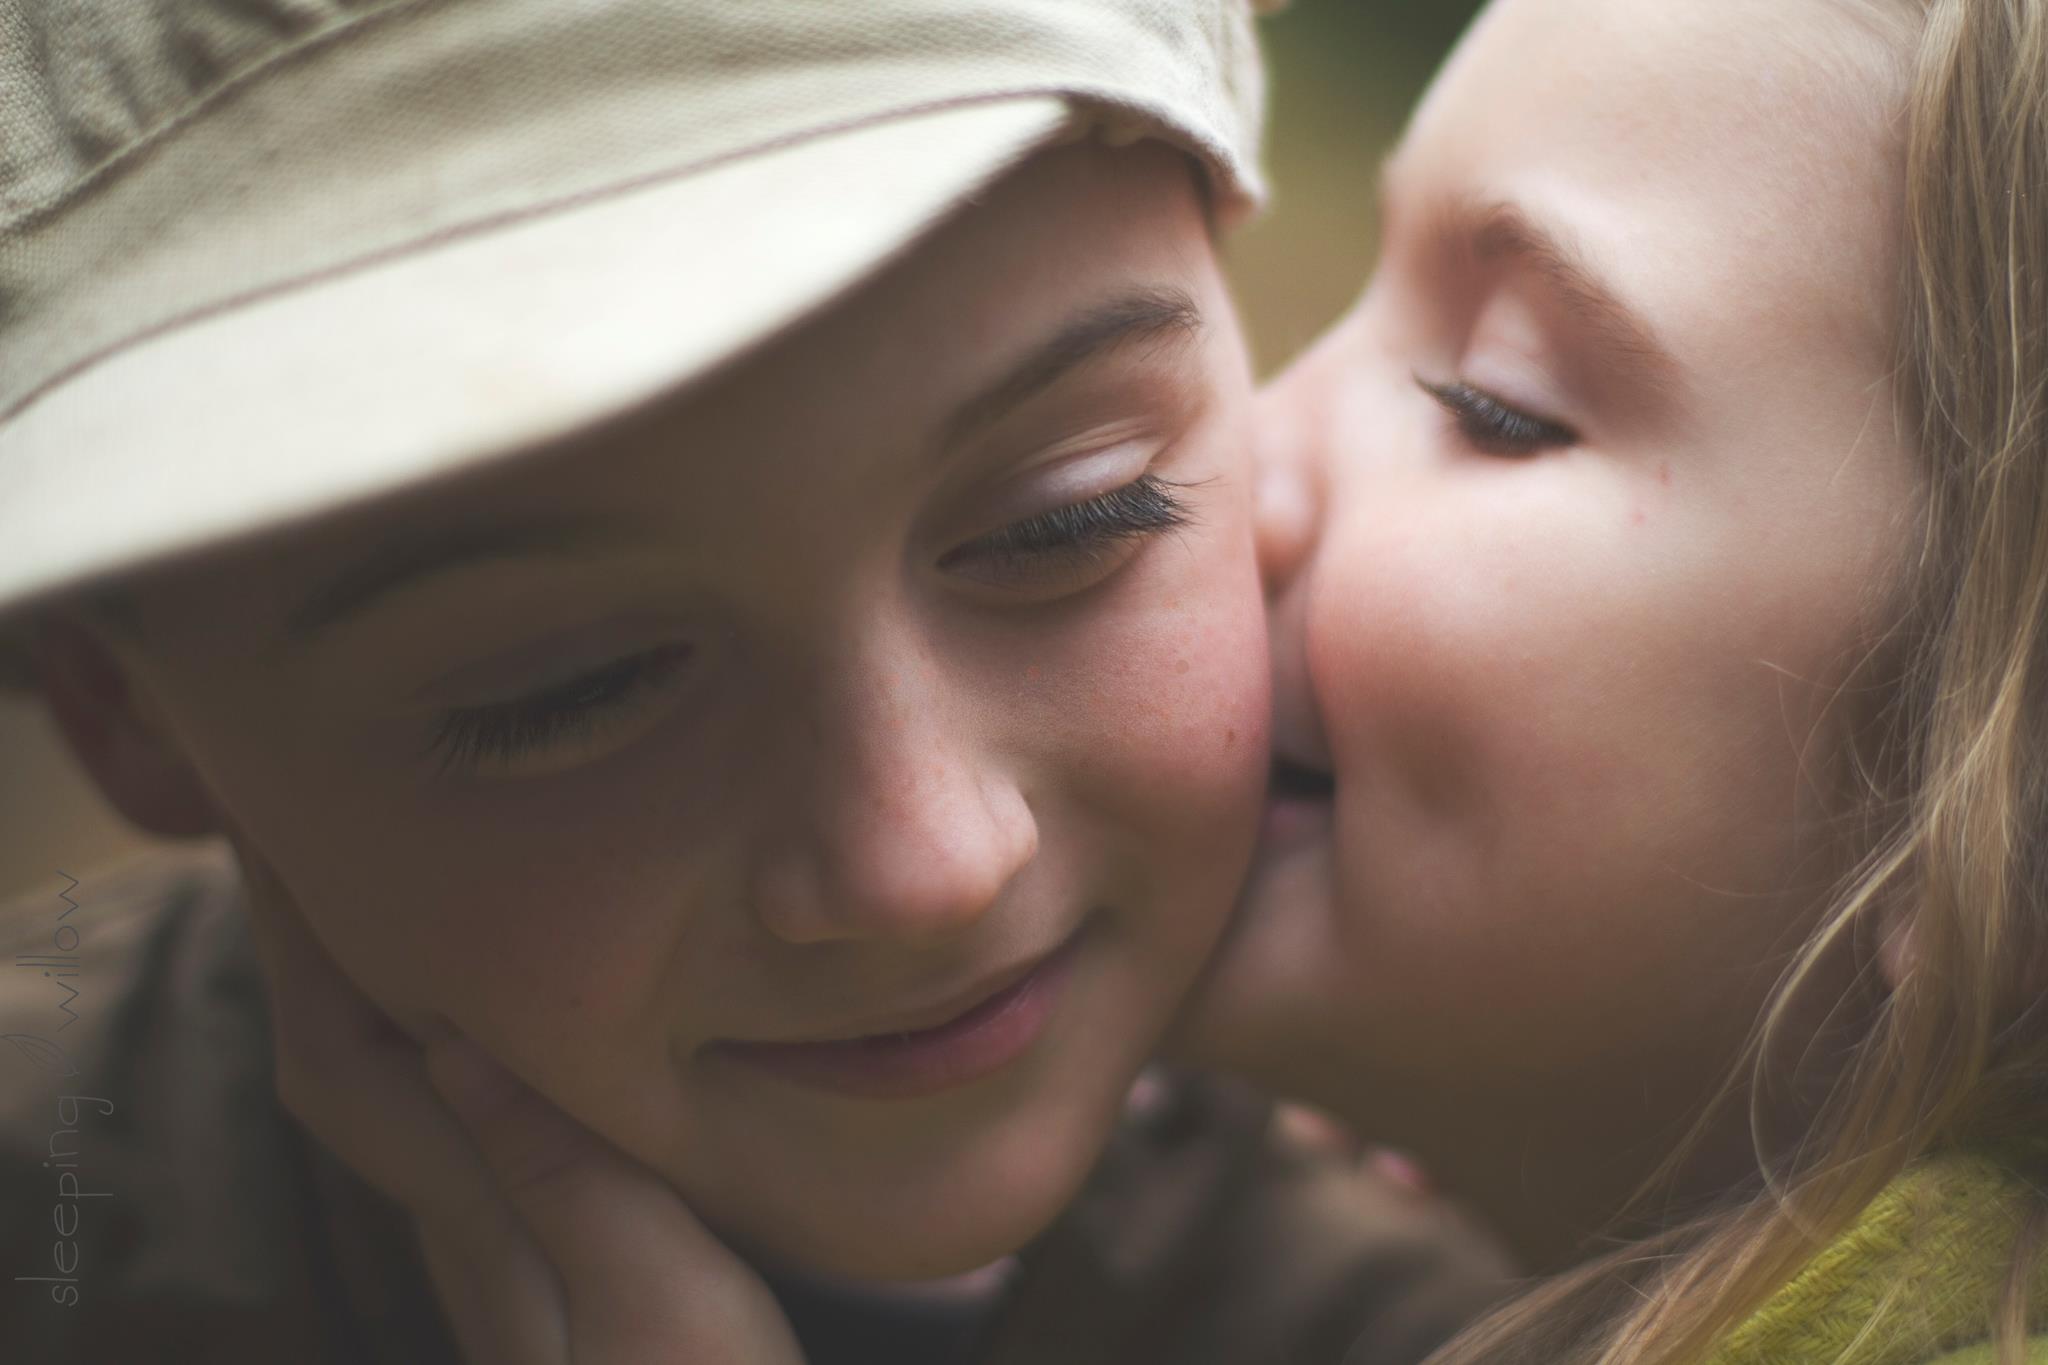
Now here’s the last thing I want you to hear: There are certain areas of art that are always pure opinion or a matter of personal style. I don’t want you to be shattered if someone thinks your image is too dark, but you like dark images. I like my images bright and sun-drenched, but that doesn’t mean that I can’t adore The Sleeping Willow’s darker, moodier, and whimsical images of her children; we simply have a difference in style.
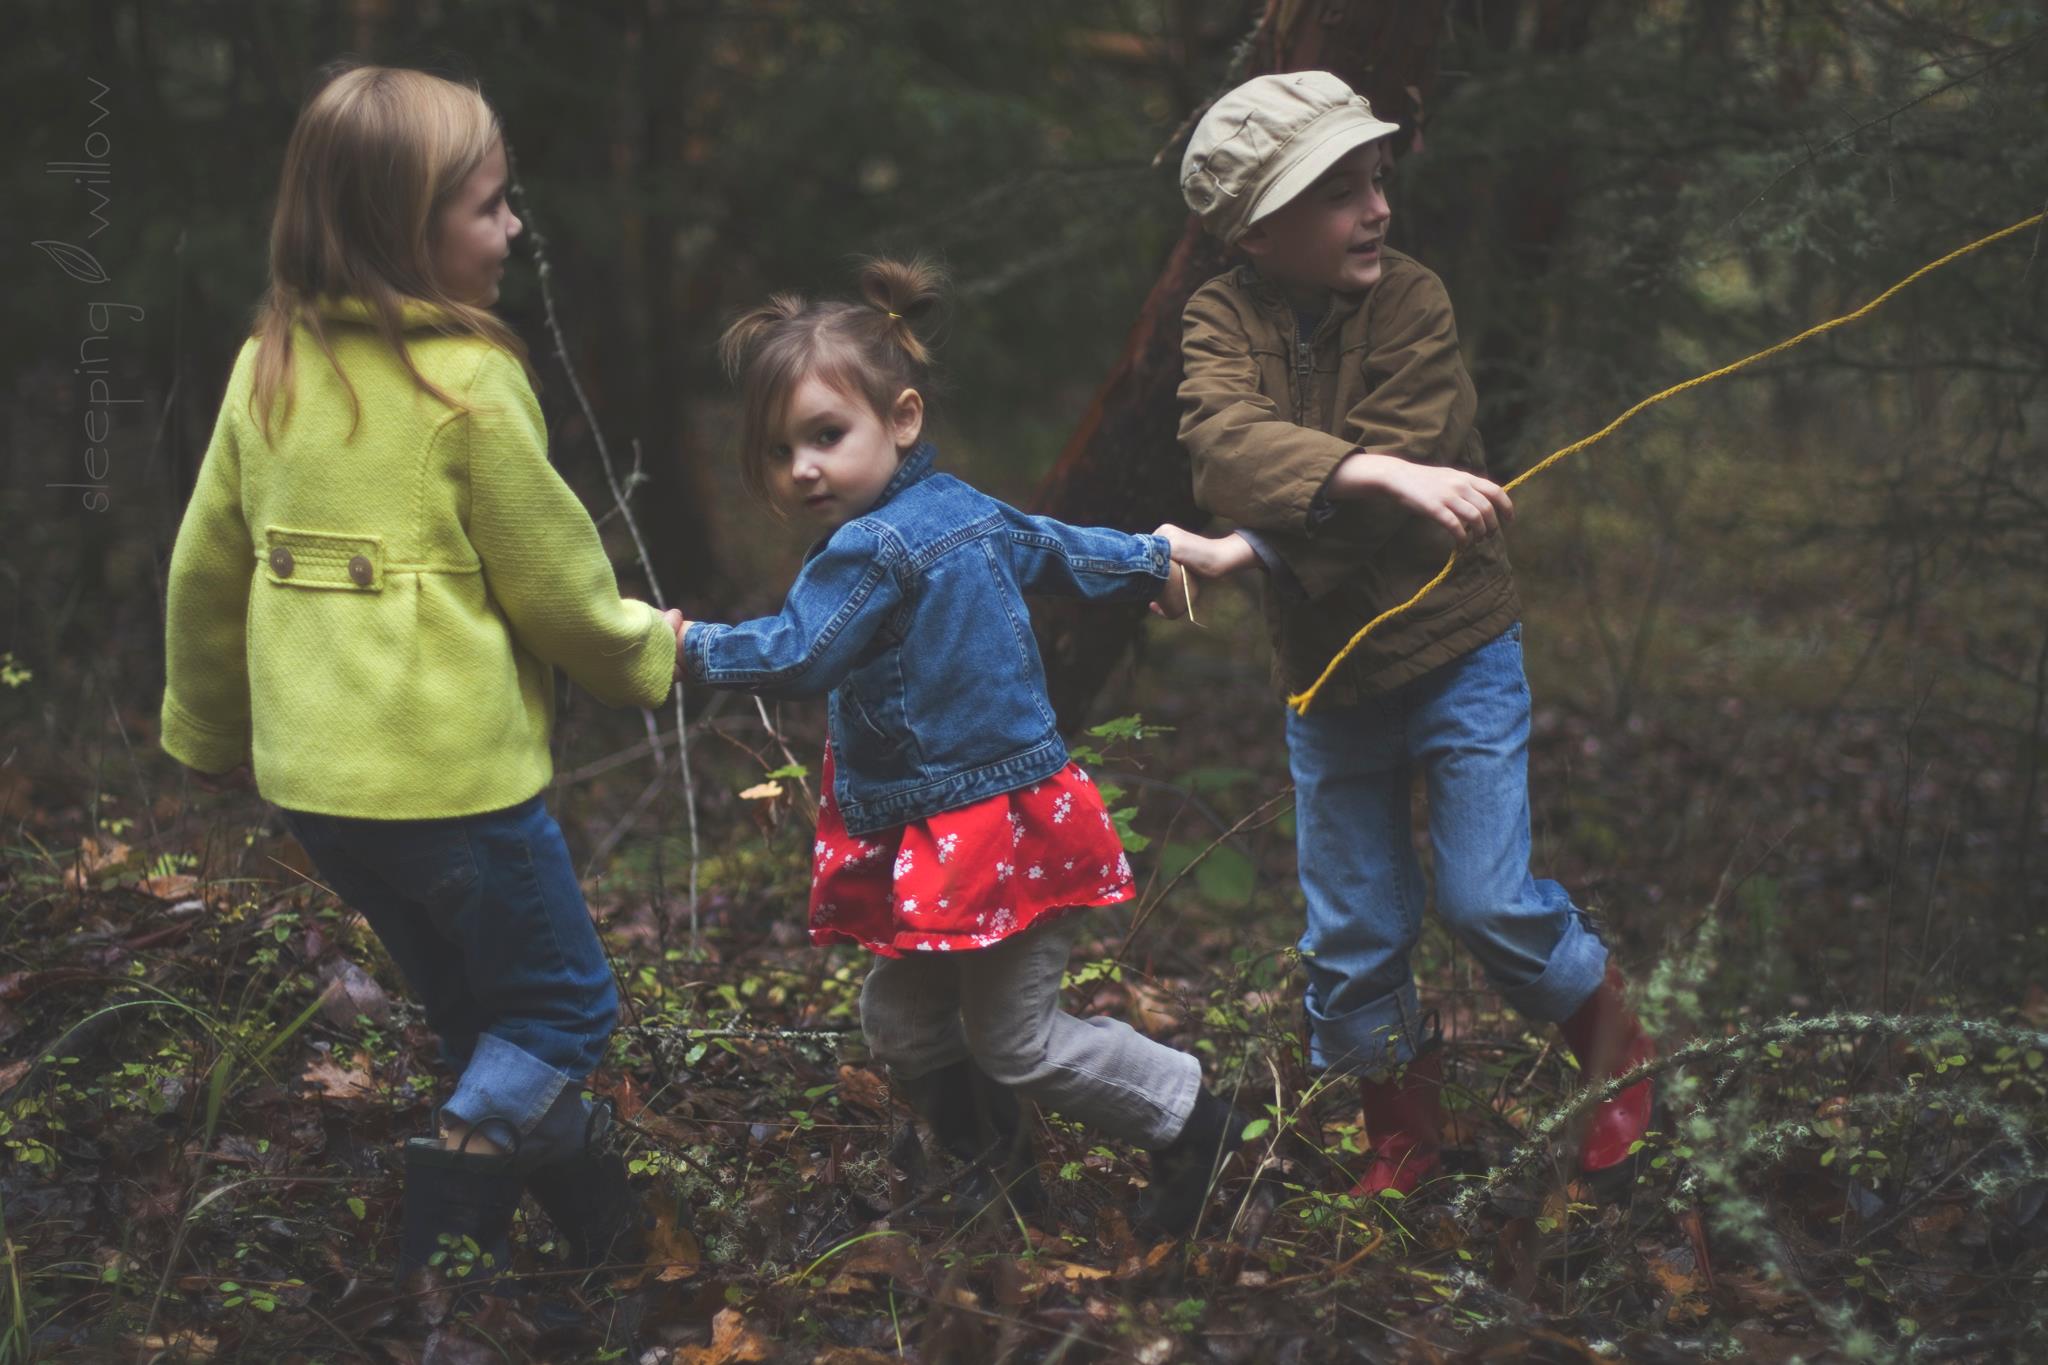
All of these images are Hannah’s from The Sleeping Willow. They’re so different from my style exhibited above and I adore each of them!
Don’t be shattered when someone comments on something you think is integral to your style. That said, please be humble enough to listen and look for the hint of truth in what they said.
Most of all, I want you to spend these three weeks exploring and having fun. I can’t wait to see what you love to photograph!
01
2013(Note this class is from 2013. Each class lesson is still below but you will not receive any instructor feedback and the Flickr Group is no longer active.)
I’ve had a camera in my hands for the better part of 12 years now. I was a 16 year old kid chasing around my babysitting charges. A 17 year old kid spilling chemicals all over the darkroom. An 18 year old kid hand coloring a black and white image. A 20 something recording those crazy moments on your dorm that bring so much laughter. A mid 20s mom taking pictures of her kiddos.  For two years now, I’ve been called to pursue this craft professionally. I’m not making a whole lot of money right now and, honestly, a lot of my clients are friends and family who are receiving a gift. Money isn’t really what I’m after. No, my end goal is to have a client laugh over the capture of that one face their their kiddo makes that is so them, to walk into a client’s house and see that frozen in time moment right above the mantle, or to give that mama an album exploding with her whole family while she weeps tears of joy. Those are the moments that make my soul sing. I love giving the gift of photography to clients and friends.
Teaching the Craft
When I pause to dream about where this business might go, there’s always a tug on my heart to teach. To gather a group of friends around me and teach them to capture their own memories. Give a man a photo and they’ll cherish the memory forever. Teach a man to take photos and they’ll capture memories forever. I’ve tried numerous times to do just this, but in this season of life it’s just hard to do. Eventually, I’d like to host (or be a part of) one or two day retreats to help new photographers learn their craft, but that time is not now. Yet while participating in Holley Gerth’s God-Sized Dreams Team and reading her early release of the Do What you Can Plan, I realized that maybe I can slowly move toward this dream. What if I start compiling my resources now? What if I invite you, my readers, to explore the craft of photography with me in a free beginner photography class right here through this blog? 
Would you join me in a Free Beginner Photography Class?
I’ll commit to posting on one topic every Tuesday for the next 52 weeks. You can stop by as often as you like and soak up as much information as you dare. I’ll throw in 20 or so large assignments and a mini assignment for each post as we cover the material and host a Flickr Group so we can see your finished projects and chart your growth. As I watch you grow, I’ll invite some of you to guest post your images and contribute your learning.
What will the Class Cover?
Here’s a brief list of upcoming topics. As I post in this series, I’ll update this list with a link to each individual post for easy reference.
- Assignment #1: Learning to Critique Photos
- How Cameras Work
- Camera Types
- Photography Critique Assignment Link-Up
- Camera ISO and Assignment #2
- Shutter Speed and Assignment #3
- Apeture and Assignment #4
- Depth of Field: Further Study
- Camera Light Meters and Metering Modes
- Program Mode
- White Balance
- Introduction to Storytelling with Images
- Rule of Thirds
- Student Images
- Leading Lines
- Try a Different Angle
- Detail Images
- Diptych and Triptych
- Lens Type: Zoom or Fixed Focal Length
- Lenses: Differences on a Full Frame and Crop Sensor Body
- Lenses: Focal Lengths-Wide to Telephoto
- 6 Month Student Reviews
- Camera Lenses: Recommendations and Buying
- Using your Camera in Manual Mode: Exposure Triangle
- Photography Exposure Stops
- Manual Mode Workflow
- Exposure Bracketing
- Setting Exposure in Manual Mode: the Zone System
- Painting with Light: a lighting overview
- Natural Light
- Front Lighting
- Side Lighting
- Back Lighting
- Available Light
- Modifying Light Part 1: Reflectors and Diffusers
- Modifying Light Part 2: On Camera Flash
- Portrait Lighting
- RAW or JPEG?
- Changing your Perspective
- Final Assignment and Announcements
- Nailing Focus
- Editing Software Overview
- Basic Editing: Brightness and Contrast
- Basic Editing: Magic Histograms with Levels and Curves
- Basic Editing: Converting to Black and White
- Basic Editing: Layer Masks
- Editing a Naturally Dark Image
- Final Assignment Due Date and Action/Preset Love
- Quick Clean Edits in Lightroom and Photoshop Elements
- The Finish Line and My Final Project
- Amber’s Final Project
- Teddy’s Final Project
Please let me know in the comments below what you’d like to learn over the next 52 weeks and I’ll be sure to include it! I can’t wait to see where this journey will carry us!
21
2012A Different Type of Story
When I photograph families or children, I try to tell you the beautiful stories. The funny ones. The silly moments. The laughter. The pure joy.
But pure joy it has two sides: the crazy-beautiful (those I can’t believe this joy actually happened to me moments) and the ugly-beautiful. There is a word in English for the crazy-beautiful joy- miracle. But in English there is no words to encapsulate the ugly-beautiful.
And yet the ugly-beautiful is the climax of all the best stories every told. The moment you realize that Old Dan and Little Anne aren’t going to make it after they battle a mountain lion to protect Billy in Where the Red Fern Grows. The moment where Despereaux goes back down to the dungeon to save the one he loves even though the odds are stacked against him. The moment you realize Charlotte has spun her last web and Wilbur won’t have her anymore. That split second where Frodo pus on the Ring of Power right there inside of Mount Doom and all of Middle Earth is hanging in the balance. The moment they roll the stone in front of Jesus’ tomb on a dark Friday afternoon.
My friend Karen (above!) and her husband Shamus’s story is full of this ugly-beautiful. And I feel like it needs to be told even in my 3rd person voice so that it may speak directly to the heart of one of my readers. Bear with me in the telling because no matter how ugly-beautiful things become know that joy is coming.
Karen and Shamus’s Ugly-Beautiful Story
On August 5th, 2010 I was driving to some play date grossly pregnant with Sedryn and just hoping to wear my 2 two year olds out so I could take a nap. My phone rang. I still remember Karen’s voice. “Melissa, I lost Baby #3… they can’t do the D & C until tomorrow. I don’t need to be alone… can I come over?” Karen and I were just mere acquaintances at this time, and to this day, I still regret not driving home and having her over. Oh, but Karen, she took refuge in a God who gave far more comfort than I ever could.
This song gave Karen so much comfort, and you can read more of her faithful reaction to this miscarriage here.
Karen’s and my lives intersected more deeply later when I was sleepless and exhausted with a very sinful attitude toward my own baby #3 and she drew me into her small group. She loved me when I was pretty hard to love and struggling with sin that she may have wished she’d still have the opportunity to struggle with. She challenges me weekly on following Christ in very practical ways. She actually called me in the middle of writing this post to reflect to me a behavior that I need some growth in (ouch and Amen!).
Karen and Shamus’s arms were empty on March 1, 2012, the last possible day that Baby #3 could have been born. And on that same day Karen, penned these tear drenched words.
On Thursday, December 4, 2008, God gave us Jay. On Friday, May 7, 2010, God gave us Ben. Two miracles. On Thursday, March 1, 2012, God gave me rest, fellowship, wisdom, laughter, entertainment, His Word, order, romance, and peace. What would you call those things?
When I cry about losing our precious daughter, I remember who God is. I remember that He is holding her along with the rest of His children. When I cry, I cry on God’s shoulder. That is called Comfort. You might have had comfort before. But you can’t have Comfort unless you have Christ. And I have Him. So I have everything.
Comfort from your Creator: that’s also a miracle.
Content in All Things?
On Sunday, May 6 our whole shepherding group was seated together at our annual outdoor service. The kids were elbow deep in play dough or sidewalk chalk when Karen pulled me aside to whisper that Baby #4 was on the way. Our hearts all left that worship service full in so many ways.
Two days later Baby #4 was in the arms of Jesus. This time I was privileged to hold my friend while she wept. But even more so, I was able to watch in awe as this second miscarriage transformed Karen and Shamus even more. Watching Karen and Shamus vulnerably process their grief in light of the Cross of Jesus is truly one of the biggest miracles I have ever experienced. It’s mostly impossible for me to summarize their transformation… so I’ll just once again quote Karen.
MONDAY, MAY 7, 2012
I wrote this journal entry:
I truly want to love Baby #4. But I’m too afraid to commit. Last time I committed with my whole heart and when Baby #3 died my heart crumbled. Can I handle that again? YES! Of course I can, because I know what it is to be pregnant and I know what it is to miscarry and I know what it is to have life with my child and I know what it is to have life without my child- I have learned the secret of being content in any and every situation; whether listening to my child sing scripture or digging a grave for my lost baby…
I can’t finish that statement the way Paul does. I want to so badly. And that makes my body shake with weeping.
SUNDAY, MAY 13, 2012Mother’s Day
Peter preached on Philippians 4:4-7
Rejoice in the Lord always; again I will say, rejoice. Let your reasonableness be known to everyone. The Lord is at hand; do not be anxious about anything, but in everything by prayer and supplication with thanksgiving let your requests be made known to God. And the peace of God, which surpasses all understanding, will guard your hearts and your minds in Christ Jesus.
These verses are just before Paul says this:
Not that I am speaking of being in need, for I have learned in whatever situation I am to be content. I know how to be brought low, and I know how to abound. In any and every circumstance, I have learned the secret of facing plenty and hunger, abundance and need. I can do all things through him who strengthens me.
(Philippians 4:11-13 ESV)
That’s the secret I wanted to say I knew last week. And I couldn’t.MONDAY, MAY 14, 2012
If we miscarry again, we can rejoice. Which is not the same as being happy. We can rejoice in the midst of deep sadness.
Can I say that I am content in any and every situation? I can say that Christ died for my sins and I am redeemed and reborn and growing to be like Him and saved from eternal punishment, no matter what my situation. And that brings joy every time I say it.
Every good and perfect gift is from above. A child is a good and perfect gift. If God puts another child in my womb, it will be like Christmas morning when you’re 7 years old! A gift! The one we wanted most!
We know that we will struggle with anxiety and fear apart from a particular miracle. But we will refuse to struggle with love.
Karen has a hat for each of her four children.

Soon she’ll need another one.
And Shamus and Karen are anticipating the birth of Zan with so much joyful hope, but only by the grace of God. For through their suffering, they have learned the secret of being content. Not the secret of happiness, but the one of joy. Joy in a God who gives the greatest gift, His Son.
Karen’s Lifestyle Maternity Photography Session
Now I’ll just let you feast your eyes on the fun we had at the Cronin’s lifestyle maternity photography session. I love these two!
