26
2013“You don’t make a photograph with just a camera. You bring to the act of photography all the pictures you have seen, the books you have read, the music you have heard, the people you have loved.
~Ansel Adams
I am primarily a storyteller.
All my arts fall under this category. Quilts and dresses: stories stitched, lived in, and memories made under them. Writing: the weaving of story with language. Knitting: the story of how yarn and pattern and love intertwine. Photography: capturing a story in images.
I’m best known for newborn imagery, but that’s not the type of imagery that gets me fired up the most. I’m most passionate about telling the story of my clients (or my own family) and capturing those little details we’ll most likely forget. Those relational moments and telling the story of each family’s “us” are what gets me fired up.
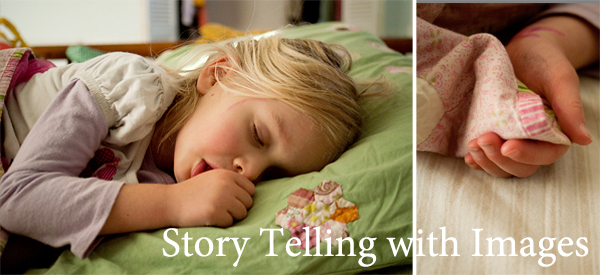
This is my Bronwyn Girl. And these two things are simple, real parts of her everyday story.
That thumb tucked in her mouth. Those fingers wrapped securely around that blanket corner.
Not to mention the marker all down her face in her favorite color.
You don’t see many of those images on my page because I have a hard time convincing folks to let me come over and photograph their morning bedhead as they tickle their children in bed. And then following them through the Saturday morning pancake ritual. And the cranky tears with the baby is ready for nap. The way the toddler plays. The way Dad looks at Mom with such respect and desire after so many years. That is what my storytelling photographer heart longs to capture.
Capturing your own Story
It’s pretty safe for me to say that the number one thing you’re wishing to capture as a beginner photographer is your day to day life/interactions and what you see as beautiful. We’ve spent the last 3 months mastering a bunch of technical mumbo jumbo so that we can take better images. We’re going to pause here on the technical stuff and let it all soak in while we work on telling our own personal stories with images.
Until we jump into manual mode, I want you to shoot in Program as much as possible, but supplementing with Aperture and Shutter Priority when needed. But for the next few weeks, the class focus is going to change drastically to storytelling with your work as you master Program Mode/White Balance/ISO/Exposure Value and when to focus on Shutter Speed and Aperture.
Storytelling with Images Mission Statement (Assignment #1)
The way you tell stories with your imagery is going to be different than the way I tell stories. God created us as two different people with two very different viewpoints and purposes on this planet. That’s okay. Sometimes I’m afraid to show you my own “real” imagery because I don’t want you to mimic my storytelling style. I’m also afraid you’ll hate the way I tell stories, but that’s my own baggage (and likely will be a fear you’ll fight too).
I want you to sit down and write a mission statement. I want you to write, as simply or as elaborately as you want, what you want to do with your imagery. Don’t roll your eyes at me. You’re an artist with a camera and in order to get the most beauty in your work you need to have an end goal in mind. What do you want your work as a body to say and do?
Read More»19
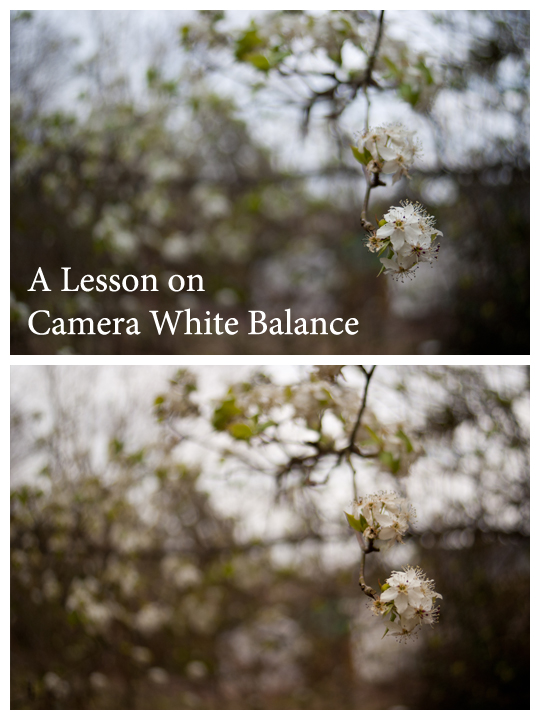
2013Today we’re going to focus on learning about Camera White Balance. First, here’s a few of my favorites from the last few weeks assignments taken from the our Group Flickr Pool.

Wander by TeddyBouch. He used spot metering here and thinks it landed on the bottom of the cliff making this image brighter than he likes. Oh, but I like it! I like how he’s lower than the subject, the blue of the sky, and the sharp contrast of her clothing on the otherwise natural surroundings. The only thing I crave is a few more clouds in the sky… but I don’t expect him to sit around all day waiting for them to come.

Glass Chandelier by SaraBeth. I know it says by Teddy, but these two played a joke on me and switched cameras/posted to the other’s account to see if I would notice the style changes. Tricky! And they totally got me! But I love that my class feels comfortable enough to tease me. Well played! Anyhow, I love the unique angle of this everyday object. I don’t like the yellow cast from the tungsten/incandescent lighting (which we’ll learn to correct in this post!). But I do love how the shot has rich contrast.
Stream by Andrew Aldrich. What drew me to this image is the strong leading line of the stream from the dark foreground to the lighter background. It seems like an invitation to adventure! Andrew used center weighted metering for this image.
Fungus/lichen at EV. -0.3 by Amber. Amber wishes that she had closed down her aperture to have more wood grain in focus for this shot, but it’s exactly the fact that the fungus/lichen is so much more crisp than the surrounding wood is exactly what caught my interest. I think it was good use of a shallow depth of field. She posted both this image and another at EV-0.7, but likes the brighter one better. Me too. I’m not sure I would change anything about the image: the swood fills the frame, the texture is stimulating, and the fungus/lichen is a clear subject. Well done.
White Balance
White balance is the process of making objects that are white appear truly white in your image.
Different lighting sources create unwanted color casts in your images. Have you ever taken a photo inside and had it turn out too yellow? Or taken one outside and noticed that everything looked blue? These are both situations where your camera’s Auto White Balance (AWB) has failed.
Changing Camera White Balance
There are two ways (that I’m aware of) to change white balance: using an 18% gray card and adjusting in post processing (editing software), or changing the white balance manually in camera.
18% Gray Card
If your card is large enough, you can actually use a gray card to set both exposure and white balance. Gray cards are relatively easy to use and relatively inexpensive, however it’s not ideal in situations where your subject is moving quickly or your light source is constantly changing (sunset, fast moving clouds bringing your subject in and out of the shade, etc).
To use a gray card to set exposure/white balance, you will hold the card near to your subject’s face and fill the frame with the card. Adjust your exposure value scale to 0 and you’ll nail exposure. You’d have to do this in manual mode, however, to avoid the camera re-metering the scene when you remove the card. To use a grey card for white balance you’ll also snap a picture of the card. Do this in each new lighting situation.
To change the white balance using the gray card, you’ll open your photos in your editing software along with the image you took of the grey card in that scene. You’ll need to sync all your photos and click on the grey card with your white balance tool. This can be done in Lightroom and the RAW editor of Photoshop Elements and Photoshop Creative Suite.
Using a gray card for exposure may suite your style in time, but the use of editing software to set white balance for even your casual shots is often more work than a casual photographer wants to do. It’s more work that I want to do for anything but my newborn work (because newborns have enough color casts naturally that I have to edit without added color casts from improper white balance)!
However, some camera’s allow you to change the white balance through your image of the gray card by importing the custom settings into your pictures until you change it again. I just found out I had this feature so I’m unfamiliar with how to use it (and I think my Manual is currently missing in action… ahem) If you’re lucky enough to be able to set your white balance from an image of a gray card in-camera, then feel free to take advantage of that process.
If you’d like to use a gray card, here are some that I recommend. I’ve used a simple cardboard gray card like this one since my high school film days for exposure and white balance; most of your local camera shops should carry a gray card like this. I recently purchased this set by Optek
for use when I am editing in Photoshop Elements Raw (thought it’s more useful in the Lightroom’s Raw and full Photoshops Camera Raw). Unfortunately, the Optek version is too small to fill your frame with for exposure. If you find that you really like your gray card for exposure and white balance this Lastolite -Grey/White
card looks super durable (compared to cardboard) and folds up for easier transport. (all of these links are affiliate links. I have tested and tried both the cardboard and Optek cards and will recommend them. The Lastolite card has good reviews, but I have not used it personally).
If the gray card option attracts you, then feel free to pick one up to experiment. If it doesn’t, don’t worry because you can do most of your white balance work in-camera.
In-Camera White Balance
So for most of us, the best day to day option for white balance is going to be switching our camera out of Auto White Balance when we notice a lighting situation that will create color casts (or even all the time if you feel so inclined!)
Like exposure value, each subcategory of white balance is going to have a scale from -2 to +2. This scale is in even integers unlike the exposure value scale. If you move toward the – negative side you’ll be allowing more of the color cast caused by that lighting situation. If you move to the + positive side you’d be erasing more of the color cast caused by that lighting situation. Adjust this scale as necessary if things still look a little off in your image.
The following are each of the typical In-Camera White Balance settings except for Auto White Balance (AWB).
All photos below this point are credited to TeddyBouch and Sarabeth. You can click on them to see who took which image if you like :).
Daylight
Use Daylight White Balance when you’re outside in bright sun with little clouds.
Shade

Do you see how the whites in these flowers have become a cool bluish gray? Using +1 or +2 might have lessened that effect.
Use Shade White Balance when you’re outside standing in the shade (under an awning, in a house’s shadow, under a tree). This white balance will sometimes produce a yellow/orange cast when too strong, if you see this just adjust your scale toward the negative.
Cloudy

You see how the whole world looks blue and angry? This is another AWB fail. However, I sort of like this effect in the case of documenting this storm about to prey upon this poor unsuspecting airport! Moving to +1 or +2 might have made this scene slightly warmer.
Use cloudy if you can hear Christopher Robin saying “Tut! Tut! It looks like rain!” You won’t need to use this if there are just a few clouds in the sky (use Daylight there), but if you’ve got a good cloud cover it’ll be your best bet. This white balance will sometimes produce a yellow/orange cast when too strong, if you see this just adjust your scale toward the negative.
Tungsten/Incandescent

Do you see how the white behind the main rose is more of a yellow tint? Tungsten/Incandescent lighting produces a very yellow light. AWB often fails to counteract that leaving the whole photo with a yellow hue. This was shot in Incadescent White Balance mode, but needed a little more push to the positive side.
Use Tungsten white balance in situations lit by old Edison filament style lightbulbs or Halogen light. This white balance will give a sharp blue/magenta cast when too strong, if you see this just adjust your scale toward the negative.
Florescent

This is a really great white balance for florescent lighting where it’s easiest to over or under correct your white balance.
Use this in situation lit by florescent bulbs of all types. In the newer “daylight balanced bulbs,” you may automatically adjust the scale toward the negative. When too weak this white balance will give you a blue/cyan cast, if you see this adjust your scale toward positive. Florescent, especially the daylight balanced bulbs is sort of in the middle of the scale. That is why I’ve changed this up here and told you weak rather than strong. The effect of messing this one up is more visual in not adjusting the white balance up enough.
Flash
We’re trying hard not to use flash right now… but when I teach you how to correctly use that annoying pop-up flash you may want to play in this white balance area 🙂
Color Temperature/Kelvin
This is highly technical and outside of the scope of this class… but if you’re really unhappy with your white balance, feel free to read this article about the Kelvin Scale to learn a bit more.
Custom
This is where you can set your white balance off your gray card or another neutral item in the frame. Read your manual (and I will too!) to find out how to use this if the gray card appeals to you.
White Balance Assignment
Both Point and Shoots and DSLR/DSTL have pretty much the same white balance settings. So the good news is that if you can find your white balance menu you should be pretty set from there.
- Notice your lighting source, adjust your white balance accordingly, and take 3-5 shots in different lighting situations. If you’re unsure whether you should have used positive or negative on the scale take a few shots and post one or two. But I bet the computer monitor will clear that up for you really quickly 🙂
That’s it! A simple assignment for a pretty simple concept! I’m looking forward to seeing your images in the Flickr Group. Feel free to join in at whatever point during this series 🙂
Next week we’re starting a 7-8 week break from all this highly technical camera knobs and settings stuff and moving on to storytelling with images. We’ll circle back and learn manual mode at some point, but I really want you to stay on program for awhile rather than get overwhelmed with adjusting every single setting. Let’s start having a little bit of fun, shall we?
12
2013Last week we learned how our camera light meters are used to determine exposure in Auto, Aperture priority, and Shutter priority modes. We also learned that our camera’s light meters will fail miserably in the following situations:
- mostly light
- mostly dark
- scenes with a huge contrast ( very dark areas and very bright areas with very little mid tone areas).
Today we’re going to learn how Program mode can alleviate some of those difficulties without the stress of adjusting everything at once as if we were in Manual mode.
Program Mode
Program mode is pretty nifty. I personally think it would be extremely useful not only in the 3 situations above, but also if you’re photographing fast moving toddlers/kids who won’t stand still while you fiddle with settings (but are staying in the same basic lighting). Oh, and I wish the wedding I had shot (my first… and likely my last), I would have set program mode at each distinct lighting situation so I wouldn’t have been so stressed out trying to change my settings quickly in manual. Program mode is a great place to warm up to learning full manual mode.
What does Program Mode let you Control?
Program mode turns off the flash (unless you manually turn it on) lets you change Aperture or Shutter Speed, ISO, Metering Mode (which we talked about last week), White Balance, and Exposure Value. However, in program mode your camera’s light meter is still doing the main job of setting exposure. The difference in program mode is that you’re telling the light meter the exposure you want to be set.
Aperture and Shutter Speed in Program Mode
You can change aperture and shutter speed through the use of your adjustment dial in this mode. However, you can’t change them independently. So if you want an aperture of f/22 and a shutter speed of over 1/300th, you’ll need to shoot in manual. However, if you just want to specifically change one variable or the other, almost as if you were in aperture or shutter priority mode, you can do that. The important thing to remember in Program Mode is to focus on which value (aperture or shutter speed) will help you create the image you want.
ISO in Program Mode
If you can’t change your ISO in Auto, but still want the freedom of turning off your flash and changing ISO then Program mode may become your favorite ‘lazy’ mode. Just like aperture and shutter priority you can change your ISO.
Metering Mode in Program Mode
Just like we learned last week, you can change your metering mode while in Program Mode. However, you’ll find that your multi-segmented mode (or normal metering mode) will typically be fine in Program mode because you’ll be changing the exposure value to fit the situation.
The one exception is in the situation where your image has both very bright and very dark spots with little to no mid tones; in that situation you’ll want to use your center-weighted or spot metering mode to help the camera pick whether you’d like it to meter for the light or dark section of an image. You’ll never be able to light meter/expose for both the light and dark sections in a super contrasted scene so you will always have to choose one. Your camera can’t capture the world the way they eye sees it and this is one of those areas of limitation.
The only way to capture a very high contrast scene is using a a multiple exposure technique that is then combined either in camera (some pro level cameras have this feature) or in photo editing software. This technique is called High Dynamic Range (HDR) photography. We’ll touch on this again later in our class so for now HDR is trivia knowledge.
White Balance in Program Mode
White Balance lets you change the way your camera meters color in a scene. It tailors your exposure for your specific lighting situation. This is going to be the topic for next week’s class because it’s not quite as revolutionary as exposure value 😉
Program Mode’s Main Perk: Changing Exposure Value
Up until this point, your camera has chosen your exposure value. You have no say in exposure value unless you’re in Program or Manual Mode. Since we’re going to do one more technical lesson in white balance and then move on to creative storytelling with your images for a few weeks before learning to shoot in full manual mode, I really want you to focus on this idea.
What is Exposure Value?
Exposure is measured in stops. All three areas of the exposure triangle let in or close down a ‘stop’ of light as you change a variable. We’ll go into more detail about these stops when we tackle full manual. For now I’ll keep in very basic, but I wanted you to know the word stop because I’m about to use it in describing exposure value.
Your camera light meter in Auto/A/S always exposes images with a exposure value of zero. If you’ve ever shot in manual, this is what my Father in Law (and many others) refer to as “getting rid of the blinkie lights”. But if we’re spending our time getting our exposure value to zero when shooting in Program or Manual, we may as well be shooting in Auto/A/S because we’re doing exactly what the camera would have done!
So lets make this visual. Here’s my camera exposure value menu at “0” or what the camera shoots in Auto/A/S.
Here’s my camera exposure value menu at +1 (or one stop over exposed).
Here’s my camera exposure value menu at -1 (or one stop under exposed).
In this particular scene an exposure value of 0 (or what your light meter says is perfect), is closest to what my eye saw before taking the photograph.
Why would I want to Change the Exposure Value?
Read More»05
2013Over the last 4 weeks, we’ve been working as a class toward learning how to use our camera’s in modes other than Auto. I’m sure you’re all excited over being able to explore the creativity in Shutter Speed Priority (or Sports on a point and shoot) and Aperture Priority (Portrait and a few others on a point and shoot). Yet, even these two modes have their limitations. In this lesson, we’re going to explore why shooting in Auto, S-Priority, and A-Priority often produces less than satisfactory results as well as when using these modes might be a great option. But first, a round up of some of the great images taken as a part of our Aperture Assignment!
Aperture Assignment Images
I gave 6 images for the Aperture Assignment. I’m not going to number your images here because the assignment I gave was for you to get a feel for the things (like how distance from a subject and lens focal length) that affect depth of field. We discussed depth of field last week in detail so by now you probably have a feeling why these specific assignments affected your depth of field. I will categorize these as wide open and closed though so you can see the difference.
I’m also going to practice giving quick specific critique. Remember, giving and receiving critique is by far the best way to grow as photographic artists.
Wide Open Images
Jessica took this shot of her daughter using a wide open (on her lens) aperture of f/4. It caught my eye because I’m a complete sucker for detail images. The lighting on her right side hand and her shoulders is a little uneven (likely shot during mid-afternoon where there’s little shade other than the shade caused by her little body). But the focus those little dirty and thirsty hands is nailed. Beautiful day to day shot.
TeddyBouch snapped this image of a tiger (at a zoo, which you can’t even tell!) wide open on his lens at f/5.6. He was also zoomed in to 120mm which makes the depth of field on this image even more narrow. What caught my eye was the wild expression the tiger is giving me with lens eye contact. What I don’t really love is the lighting. It’s coming in at almost 90 degrees from the right side of the image. That caused the left eye to be rather dull and shadowed. But this angled lighting also creates the high contrast that Teddy really likes in his images… so it might be a style thing 🙂 Teddy nailed waiting for this expression/eye contact and threw the potentially distracting background way out of focus with the open aperture and the long focal length.
Closed Down Images
This image by Amber caught my eye because of the vibrant colors. She has a small amount of white along the right of the center where the white petals are blown out (meaning there is loss of detail in the highlight area), but other than that Amber brought us in close, nailed her focus, and has a very clear focus point on that front flower despite having a very wide depth of field from an f/22 aperture. Rumor has it she’s blowing it up for her wall and I know it’s going to make her space so cheery!
Flowers were the clear choice for closed down images because they stand for the longer exposure times required by closed down apertures. Sarabeth (my girl who is still rocking her point and shoot!!) has a highest closed down aperture of f/8. It’s sort of right in the middle of the traditional f/stop scale so the depth of field is still pretty narrow and is made more narrow by the closeness to the subject. What drew me to this image initially is the brightly colored flower. I think I might like to see this as a vertical crop with the flower on the far left on the image, though I typically prefer horizontal crops. But what I like most is the leading lines of the branches on the left of the image.

Andrew chose to document these snowy trees at f/29. I shared this in last weeks post, but I felt the need to share it again. 🙂 What caught my eye was the saturated blue of the sky. I think I would like this image even better if I could see right down to the snowy ground. Andrew really captured a great exposure where the whites are white and the blacks black with a fair dose of mid tones tossed in too.
Using Camera Light Meters: Shooting in Auto/S/A Mode
Each camera is equipped with a light (or exposure) meter. A light meter measures the amount of light intensity and while in Auto/S/A modes it chooses your exposure value for you. In plain English: your camera’s light meter is responsible for telling the camera the amount of light in the scene and it will adjust your camera settings in Auto/S/A modes for you.
Read More»26
2013So I consulted with my Flickr active class members and all of them concur that they’d rather learn and experiment in a spiral learning fashion than go ahead shoot in full manual mode. So I’m extending the aperture assignment for another week while we get more in depth with depth of field (overuse of the word depth intended… I couldn’t resist!).
Just a note: if you’re new to the class feel free to jump in! If you’ve been following along and sort of learning at your own pace, feel free to post on Flickr whenever you finish an assignment for valuable critique (just label your photo with the assignment so we know your end goal!). I personally can’t keep up with my own assignments between my 3 children, keeping up with house and client work, as well as writing the next post. The only perk for getting your assignment in “on time” is having the chance to have your image featured in the next week’s post. In short, jump in when you can, but don’t stress over falling behind.
Visual Depth of Field Study
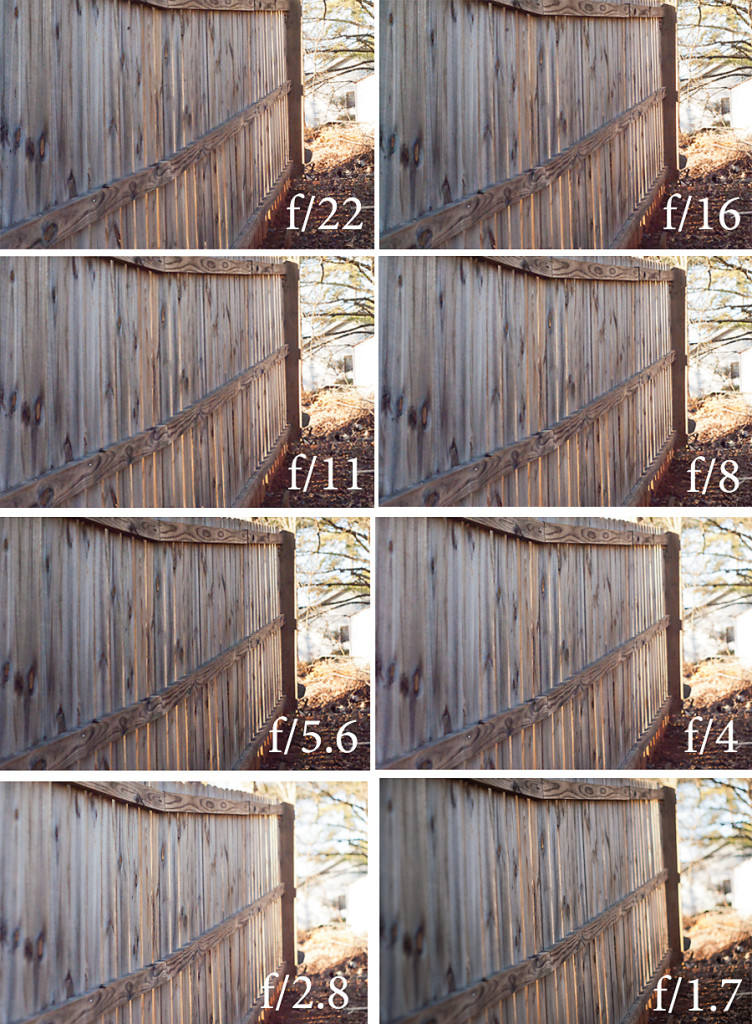
Since I didn’t have time to take photographs for last week’s post, here are a visual study of depth of field.
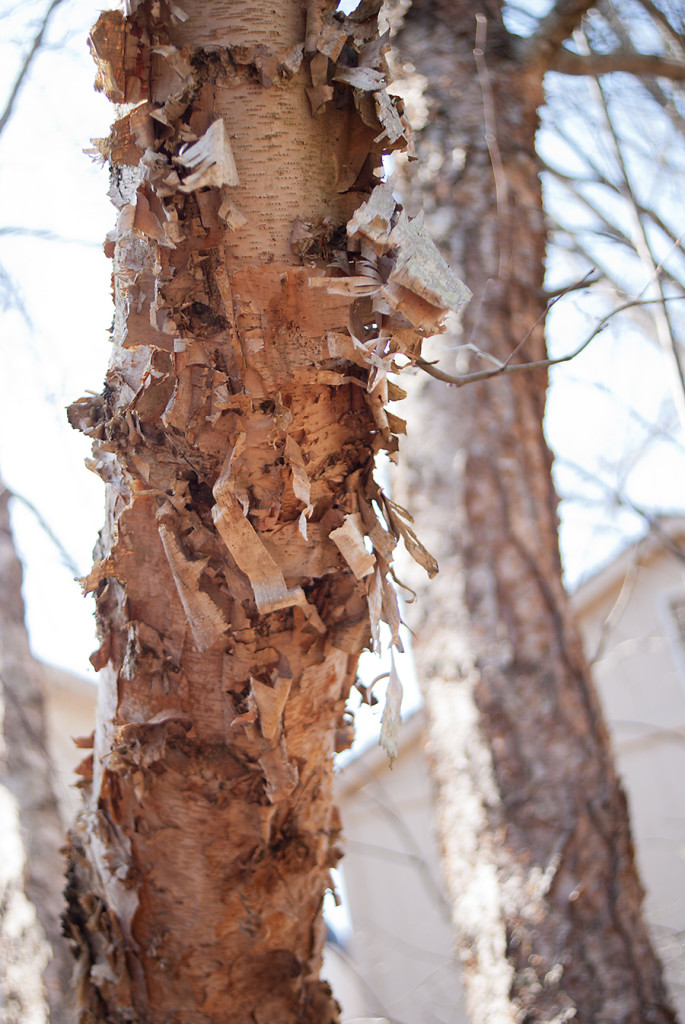
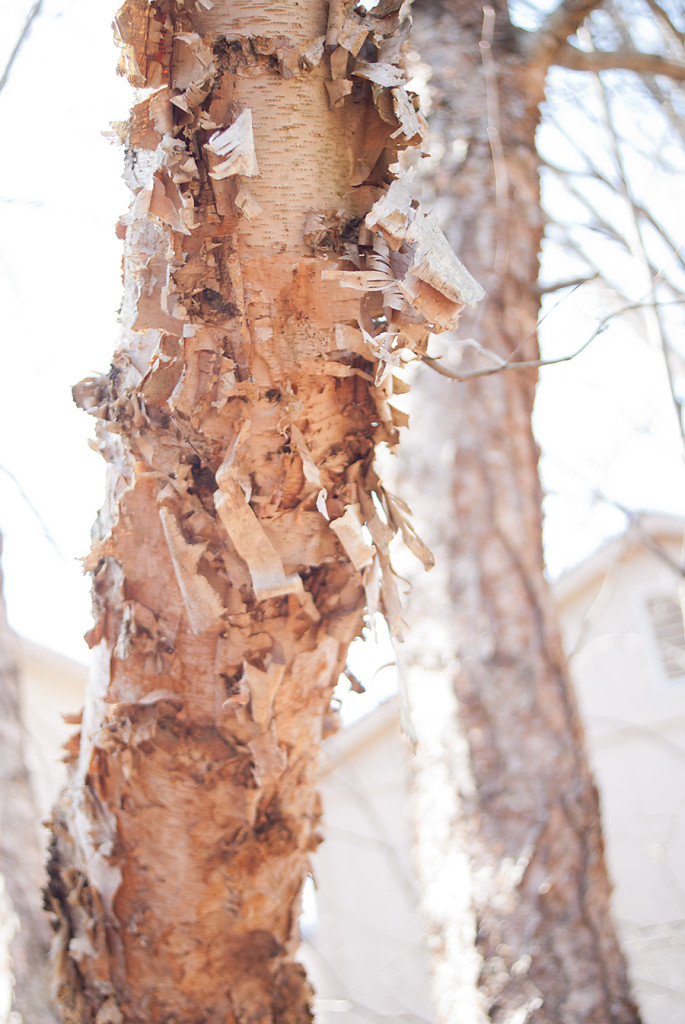
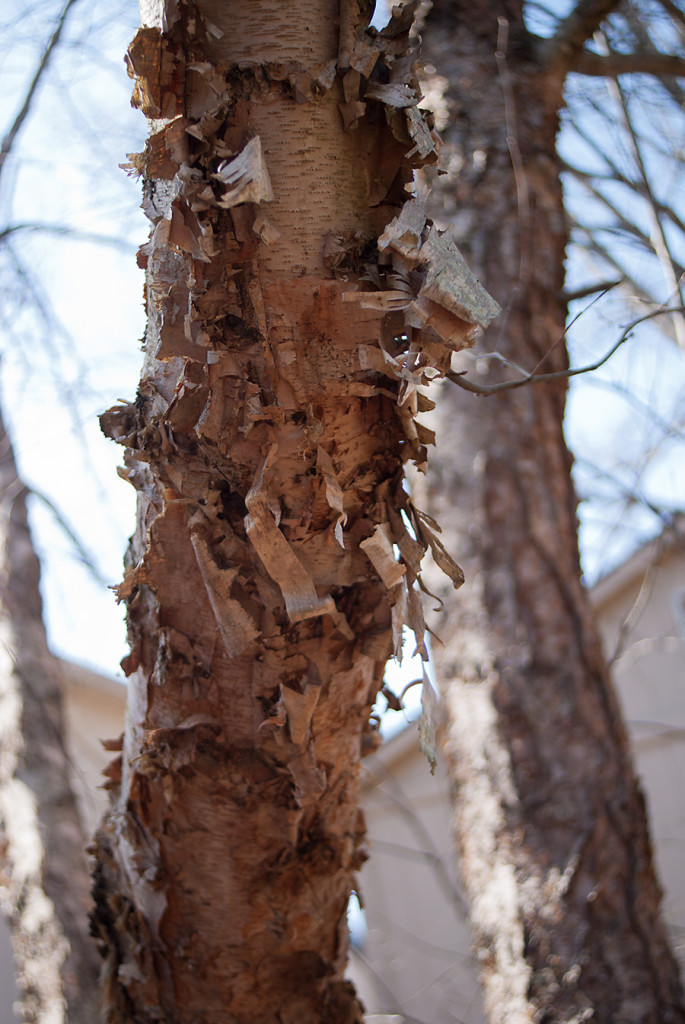
F/22 (a closed down aperture) produces a wide depth of field where nearly everything is in focus. F/1.7 (this lens’s wide open aperture) produces a very narrow depth of field. Which depth of field do you think makes this shot more interesting?
Circle of Confusion and Depth of Field
As you can see from the above image series, when you shoot wide open you end up with a very narrow slice of focus. At f/1.7, the golden board is sharply focused and a couple of boards outside of that are focused enough to be recognizable. Outside of that focused area is what’s known as the circle of confusion.

Take a look at this image above (also shot at f/1.7). Ask yourself: where did she tell the camera to focus? Where can I stop distinguishing clearly what is in this image? Is the circle of confusion more prominent in the fore or back ground? Why? Think on it a second, and I’ll give you the “answers”.
