03
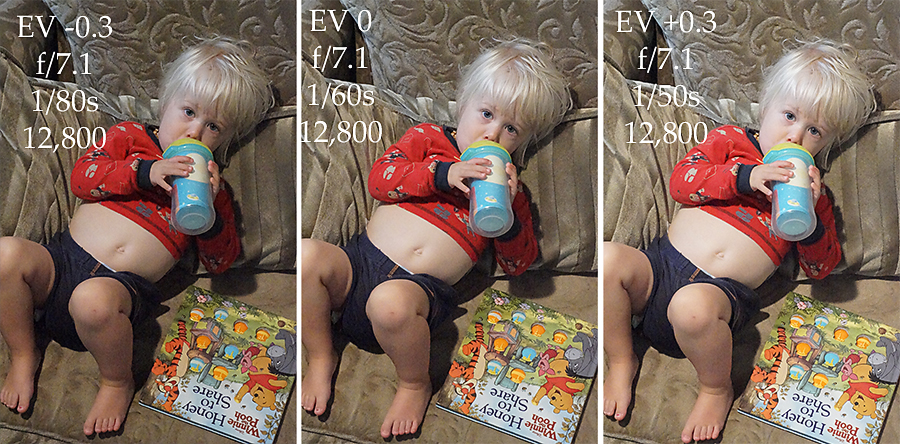
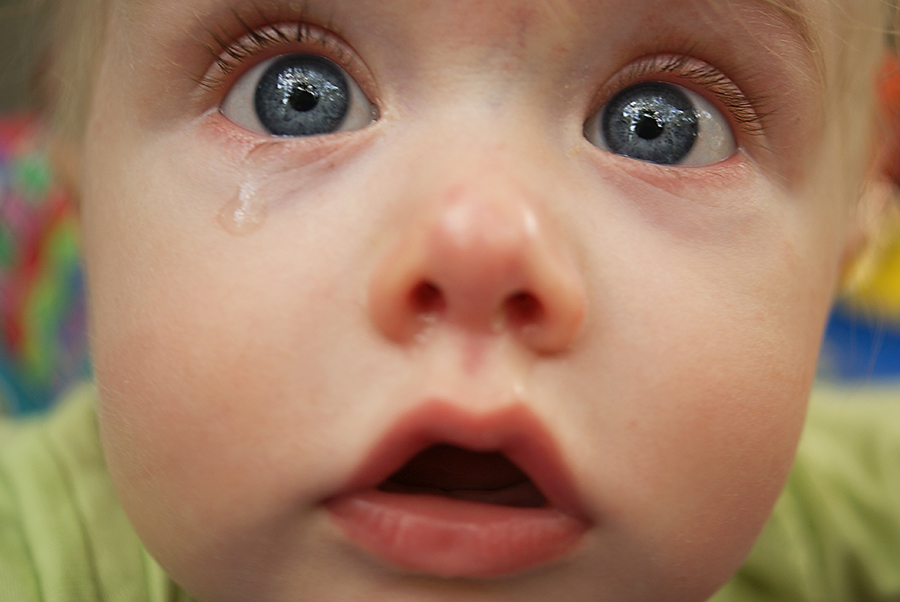
2013It’s your baby’s first birthday. You really want to shoot in manual mode, but what if you don’t get things right? What if the test image you saw on your LCD is just a tad too dark or too light? What if you mess up?
Next week we’ll jump into another math/stop based concept that helps us get exposure right the first time, but this week I’m going to teach you a little automatic cheat for those situations where you know you’re close but really don’t want to mess it up and miss the moment.
Exposure Bracketing
Back in the old days of film, if we were unsure about an image, we exposure bracketed. That meant we took an image at a zero exposure value according to our meter, then we moved both one stop up and one stop down and took two more images. If we were OCD (and had film to waste) we might do five images. Usually this would be done for a heavily contrasted image like a sunset or sunrise over a gorgeous landscape.
Most cameras come equipped with an automatic exposure bracketing mode. When toggled on, exposure bracketing takes a rapid burst of 3 or 5 images where the camera will calculate the stops for you both up and down each type you press the shutter release. In your baby’s first birthday scenario or any scenario where you are not completely sure about getting exposure right in camera: use exposure bracketing.
Exposure Bracketing Assignment
Consult your manual now and figure out how to turn on exposure bracketing. I actually had to consult my manual for my new camera on this one (Did I tell you I had a new camera? Sony a77. I’m reading a manual right along with you!) and I found that I actually have a dedicated button for braketing/self-timer. Maybe you do too, but otherwise it’ll likely be an option on your camera menu 
Use it this week while you keep on practicing in manual mode.
Upload some photos in our Flickr Group (it’s kind lonely over there… ya’ll are sorely missed, but I hope you’re enjoying your summer vacations!!!).
25
2013So week one of manual mode, you learned to adjust the dials and play around. Week two week dove right into the technicality of stops. This week I’m going to walk you through a typical manual mode workflow. This whole post will be a do-while-reading assignment. So grab your cameras and find something in your reading space that it is photo worth. Ready, set, go!
Manual Mode Workflow
Alright, you’ve got your camera. You’ve switched it into manual mode and you’ve found something interesting. Let’s start exercising our manual mode workflow muscles.
Set White Balance
Glance around your lighting situation and access whether you want to change white balance. I’m shooting outside in open shade and so I set white balance for shade.
Set your white balance and move on to ISO.
Set your ISO
The spot I’m in has a good bit of dappled shade, but is overall pretty bright. I set ISO at 160.
You’re taking a guess here but you should be close to spot on. Back in the old days when film had the ISO rating rather than a sensor, a photographer would pick out their film based on where they were shooting. Outside in bright daylight: grab a roll of ISO 50 or 100 or 200. Varied conditions, some outside some inside: ISO 400. Inside a building: ISO 800. Pretty dark: We’d push process our ISO 400 or 800 to 1600 or 3200 or fork over the big bucks for a roll of film with that ISO rating.
So what are your lighting conditions? Pick your ISO and lets move on.
Choosing what to Change Next
Now comes a decision: is aperture more important to your composition or shutter speed?
My goal is to capture my daughter playing while blurring out the background. To blur the background I know I need a wide aperture. She’s also moving pretty fast so I know a wider aperture will allow for a faster shutter speed. I’ve decided aperture is my most important setting.
If you have a fast subject and want to blur motion or freeze motion, pick shutter speed first.
Set Your Most Important Setting
I’m going to set my aperture at f/2.5 which is pretty wide open but not so wide that my fast moving subject will move too much after I lock focus. You might want your aperture at f/22 to capture the glory a full landscape scene. Or you might be setting it around f/5.6 to capture a family of 4 in good focus but still apply background blur.
You might be setting your shutter speed at 1/125 of a second or above to freeze motion or slower than 1/60 to capture motion occurring.
Now that you’ve picked what’s most important to your composition, set it.
Set your Least Important Setting
Now change your least important setting for your desired composition. My shutter speed landed at 1/160 of a second zeroed out on the exposure value/bias scale.
Take your First Shot
In film days, we didn’t take more than two shots and we couldn’t look to check and see if we got it right on an LCD screen. I’ll talk a little about one of the processes that helped us get it right the first time in the next lesson.
However, in these digital days we have the freedom to check and make sure we got it right. Use that freedom! Look down at your LCD and check out that image. Would you like it to be brighter? Darker? Aperture wider or more closed down? Does your shutter speed need to be faster? Do you need to change the ISO so that you can have a faster shutter speed or more closed down aperture?
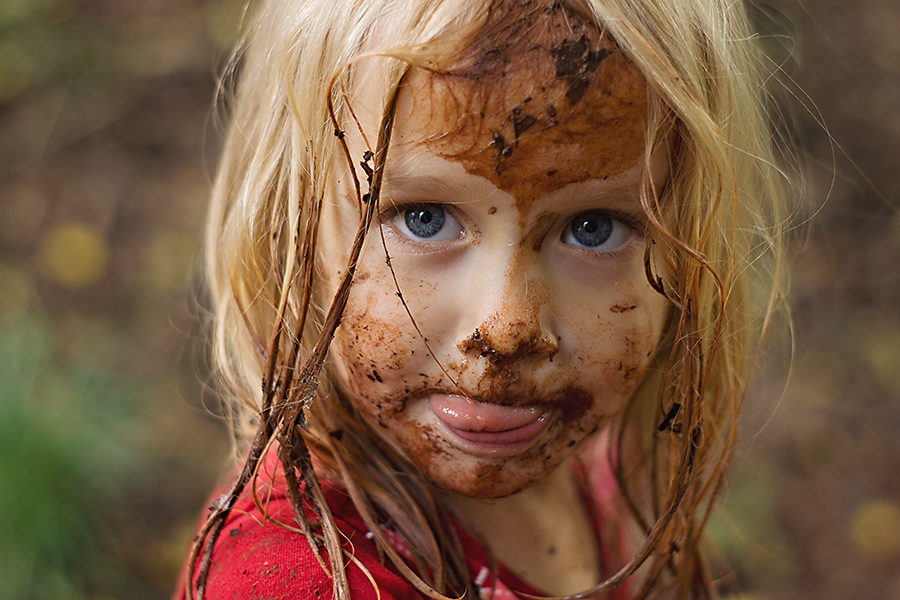
Adjust your settings if you didn’t love your first image and try again. I was pretty happy with this shot. I had spot metered (focused on the upper left eye) and I loved the interplay of contrast in both the mud and light skin and her shadowed eye. So I didn’t try again
The Benefit of Manual Mode
By now you’re thinking, “Gee, this is a lot of work just to take two pictures. Why shouldn’t I just stick it in one of the Auto Modes and let the camera do the work?”
The benefit of shooting in manual mode is that you become the one to evaluate what you need to do to create your image. You’re also able to change settings to get a brighter or darker exposure for your desired outcome as well as adapt to new lighting situations relatively quickly compared to setting exposure compensation in Program mode.
If we stick the camera on Auto then we don’t get to change according to our scene. The camera meters everything for zero and assumes everything is okay, picks a mid aperture, picks a mid shutter speed, or pops up the flash and just takes a picture.
When you begin to shoot in manual, you’re moving from a documentarian to an artist who is evaluating a scene and actively choosing what portion will draw the viewers eye.
Can some of that be done in Aperture, Shutter, or Program Mode? Sure! And there are definitely seasons where I switch over to aperture or Program. But the challenge of manual mode is that I’m responsible for creating the outcome that I desire. It makes me think and respond to changing conditions.
Your Assignment
Go out there and begin mastering your Manual Mode Workflow.
- Pick three or four scenes and start creating art. You should be ready to approach a calm mid-speed preschooler (but maybe not a lighting fast crawler/toddler) after two weeks of practice with changing your settings in manual.
- Pick at least one or two challenging scenes that are either brighter than most (snow, portraits on a beach, white on white) or darker than most (photographing a stage lit recital, capturing something at night). These will challenge you to not always set your exposure value as zero. You’ll learn which lighting situation you’ll want to move toward +1 or -1 in exposure value.
- Upload your final images with a description of what you did AFTER you checked your LCD readout of your first image. (you may need to take notes in the field) What did you change? Why? This is the most important part of the whole assignment. It’s designed to get you thinking about the whys of what you did to make this an image that you liked.
18
2013Full Disclosure: If you’re like me and managed to completely fail an open book statistics test in college, then this post might be extremely boring to you. I’m going to try to use the simplest language possible to help us all out while trying to understand this necessary part of manually setting your exposure, but bear with me through the confusion. It may be a long number filled ride. However, I promise you’ll have the knowledge to learn to precisely change exposure when you’re finished reading… even if you’ll need to practice for awhile longer
What is a Photography Exposure Stop?
A stop is a measurement of the relative brightness of the light used when setting exposure.
Super helpful, huh? Yeah, that’s as plain as I can define it in the English language. So this is where we start diving into the math portion so it’ll all make sense.
We’ve talked about stops just a little bit when we explored exposure value/compensation in this post on Program Mode. Remember how the assignment was to shoot a few things at -1, -2/3, -1/3, 0, +1/3, +2/3, +1 to decide which exposure we liked best in certain lighting situations?
Those -1, 0, +1 numbers denote stops (and the thirds in between denote 1/3 of a stop).
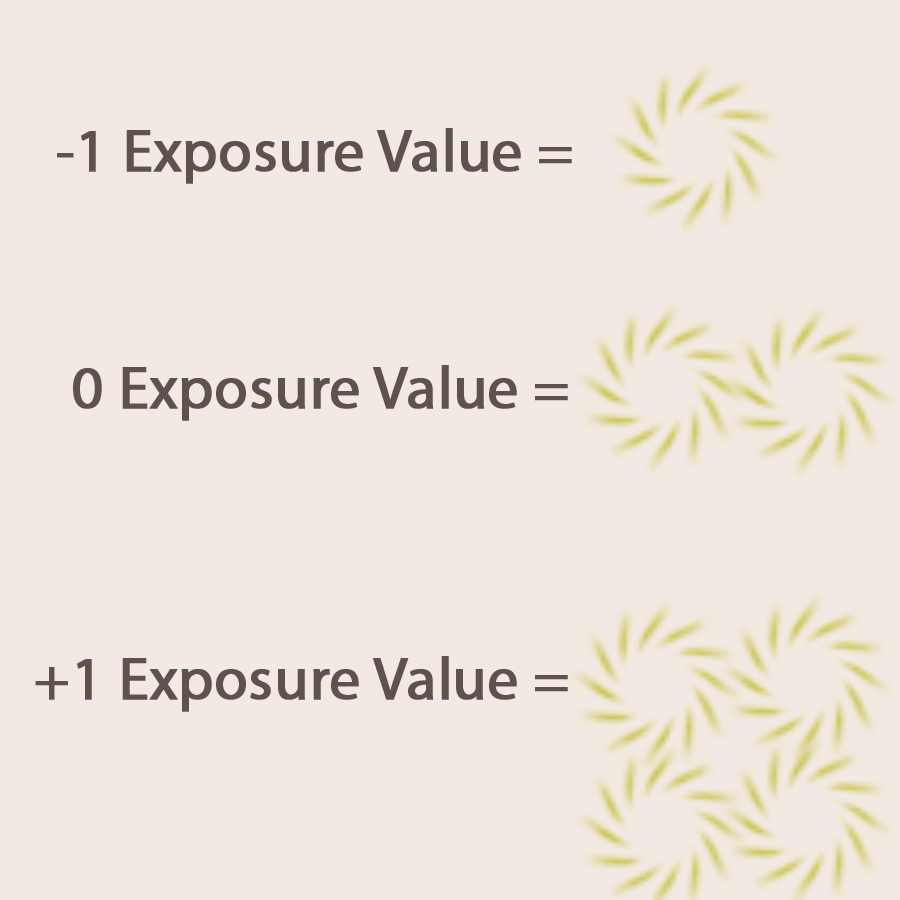
This is where the whole relative brightness thing comes in: every time we go up a whole stop relative to the one before, we’re making an exposure twice as bright. Every time we go down a whole stop, we’re making an exposure half as bright. All of this is relative to our reference point, which in this example is the 0 on our exposure meter.
So -1 stop is one half as bright as 0 stop. +1 stop is twice as bright as 0 stop. +1 stop is four times as bright as -1 stop. So on and so forth.
Let’s make this visual.
Exposure Stops in Relation to the Whole Exposure
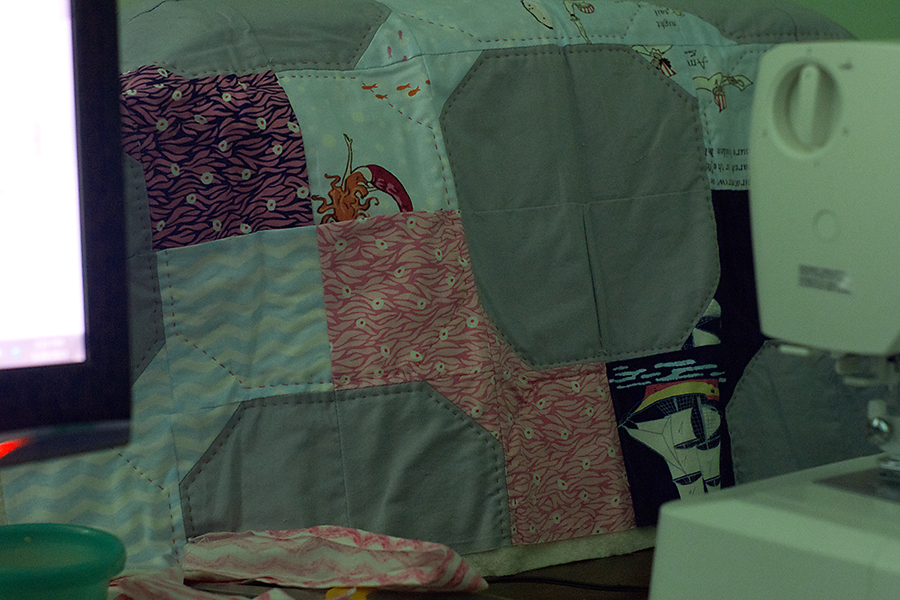
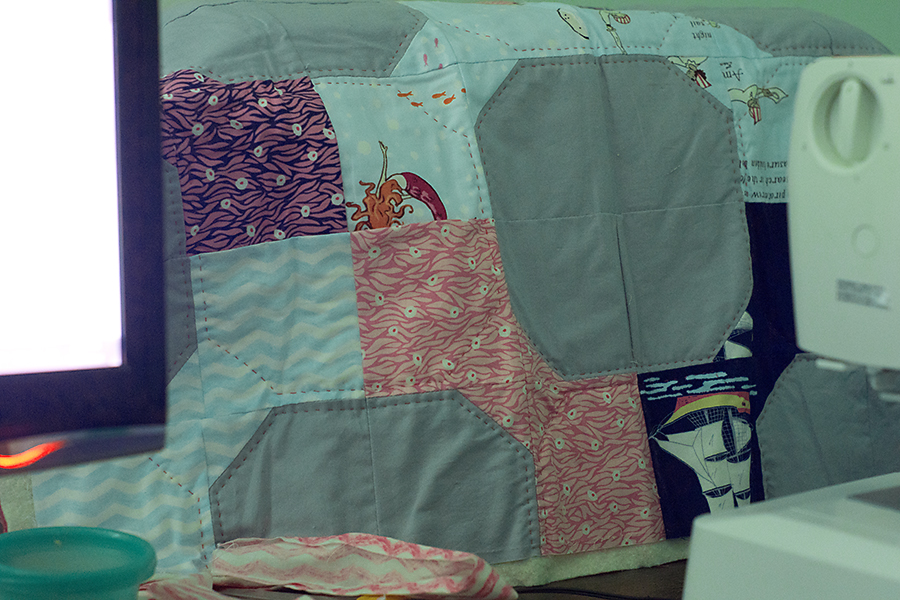
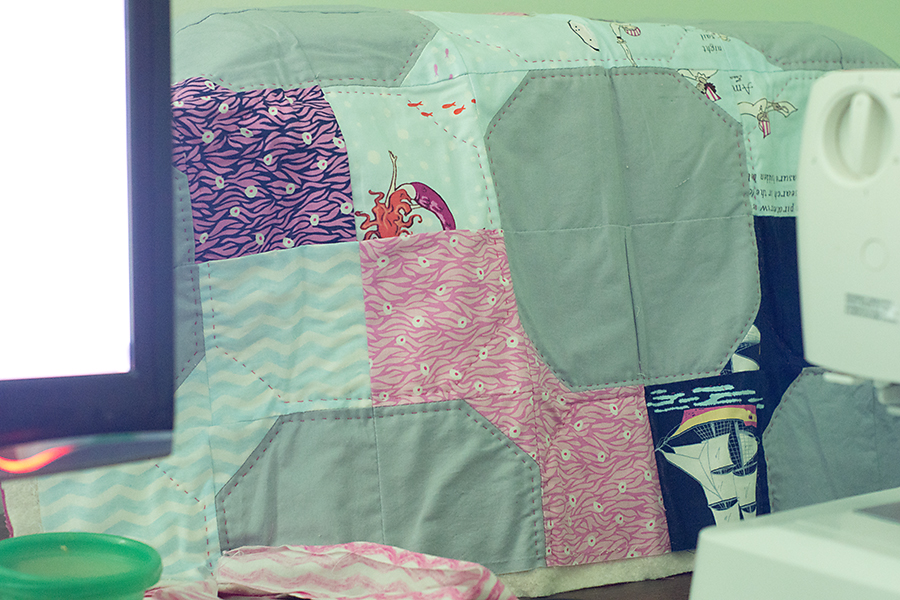
So lets say you’re sitting at your desk typing this post and you snap a photo of your workspace, because you really don’t want to go anywhere to take a fancy photo for this post (yet).
You shoot at -1.
Meh. Too Dark.
Then you bump your whole exposure to 0 on the little exposure value scale.
Not too bad and twice as bright as your previous exposure.
But just for fun you’ll give +1 a try.
Whoa! Computer screen and sewing machine corner whites are blown out because your exposure is four times as bright as your initial exposure.
You hanging with me here so far? Because we’re about to further explore the definition of stops. 
(Please don’t hesitate in the comments to let me know where the math loses you. I’ll try to explain again where it gets foggy.)
11
2013If you’ve been shooting in Program Mode for the last month+, the good news is that the jump to Manual Mode isn’t going to be so scary.
You’ve already been thinking the following things that you’ll also be asking in Manual Mode:
- Do I need to focus more on my Aperture or my Shutter Speed for this image?
- Do I need my ISO to be very high to compensate for lack of light or can I leave it low because it’s bright and sunny?
- Is this a very bright scene where I need to lower my exposure compensation to capture the brightness that I want?
- Is this a very dark scene where I will need to increase my exposure compensation to capture the brightness I want?
- What is the most important thing in this image that I should meter from?
So how does Program Mode Differ from Manual Mode?
Program Mode is still an automatic mode. The camera is still metering for the image and setting the exposures for you even if you have engaged exposure compensation. That’s not necessarily a bad thing. Program Mode is beautiful for weddings and parties where you can’t miss the shot and can set it each time your light changes. It’s also wonderful for a studio situation where you know your light and backdrop well and want to spend more time posing. And it’s also a wonderful bridge between the Auto Modes and Manual mode precisely because it makes you think like you’re in Manual Mode. And, honestly, if you shoot in program mode for the rest of your camera using life, you’re still way ahead of the average camera user.
So you might be asking, why switch to Manual Mode at all?
That’s a good question. And it’s not one that I can really answer. If you end up choosing program mode as your primary mode, then I won’t judge you (sometimes I choose Program, too). Because honestly, you’ll still be making all the creative decisions just as if you were shooting manual mode, your camera is simply filling in all the blanks.
However, I think the real benefit of shooting manual mode (even if only for a season) is that the photographer is forced to think about every relationship in the Exposure Triangle and decide whether changing one part will create the image they want. So I’m going to encourage all of you to give this a try for a few weeks.
Now let me warn you, switching from Program to Manual is going to be frustrating mainly because it takes so much more thinking and adjusting time before you press the shutter release. Where in Program mode you could adjust one thing (ISO, Aperture, Shutter Speed, or your Exposure Compensation) and let the camera do the rest, in Manual mode you’ll be doing all of that adjusting with your own fingers before each shot or series of shots. So I suggest that we practice the first week of manual mode with still life or landscapes so we’re not kicking ourselves for missing “the shot” with moving subjects.
What is the Exposure Triangle?
The Exposure Triangle is the key concept for shooting in Manual Mode.
If you’ve stuck with this class for the first half so far than you already know all of the parts of the Exposure Triangle: ISO, Shutter Speed, and Aperture. However, because we’ve let the camera pick at least one of the triangle points even shooting in Program Mode, we haven’t had really had to think about all of the ramifications of changing one point.
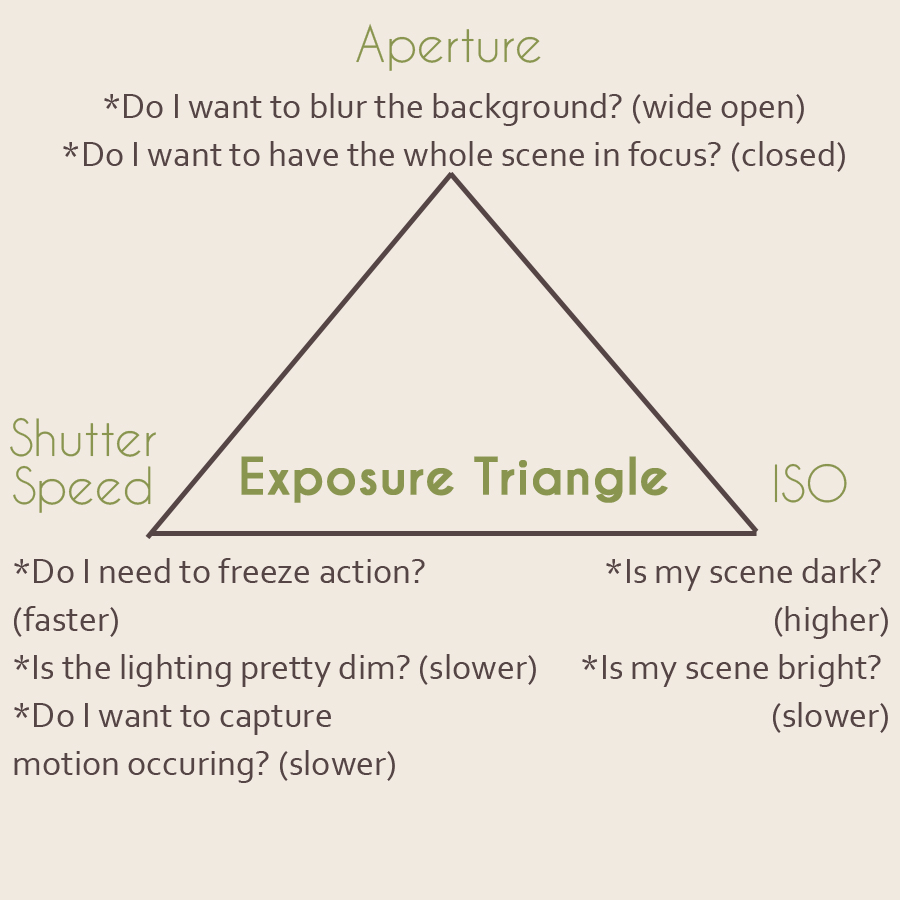
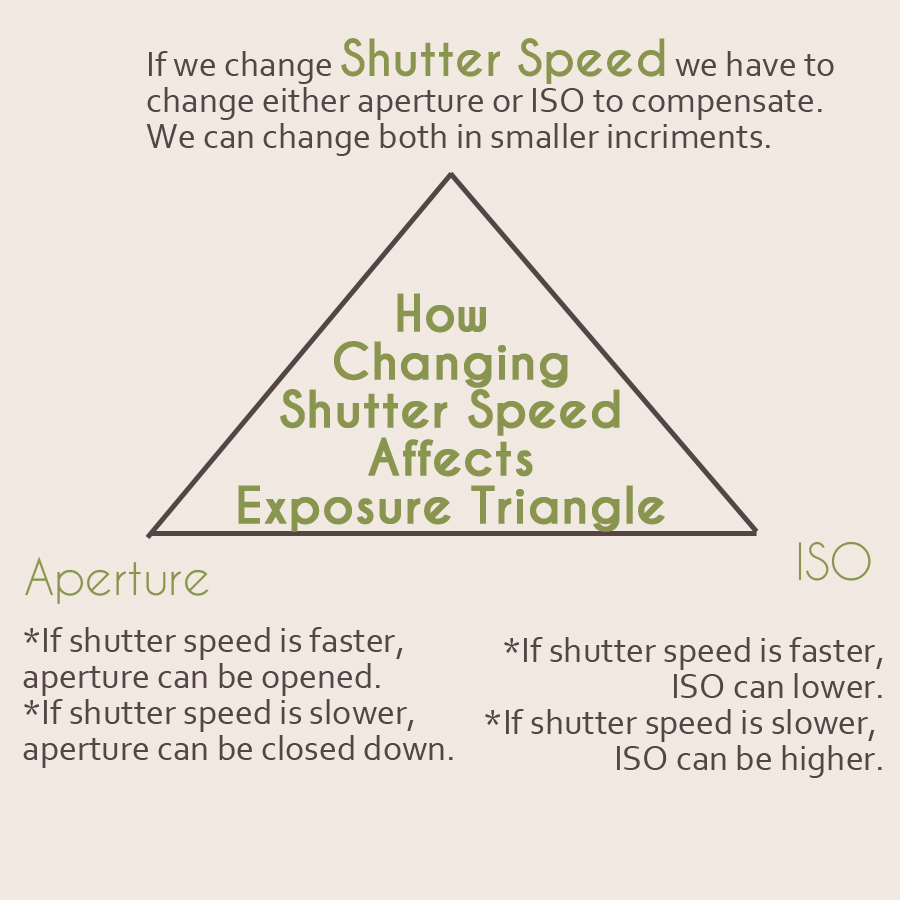
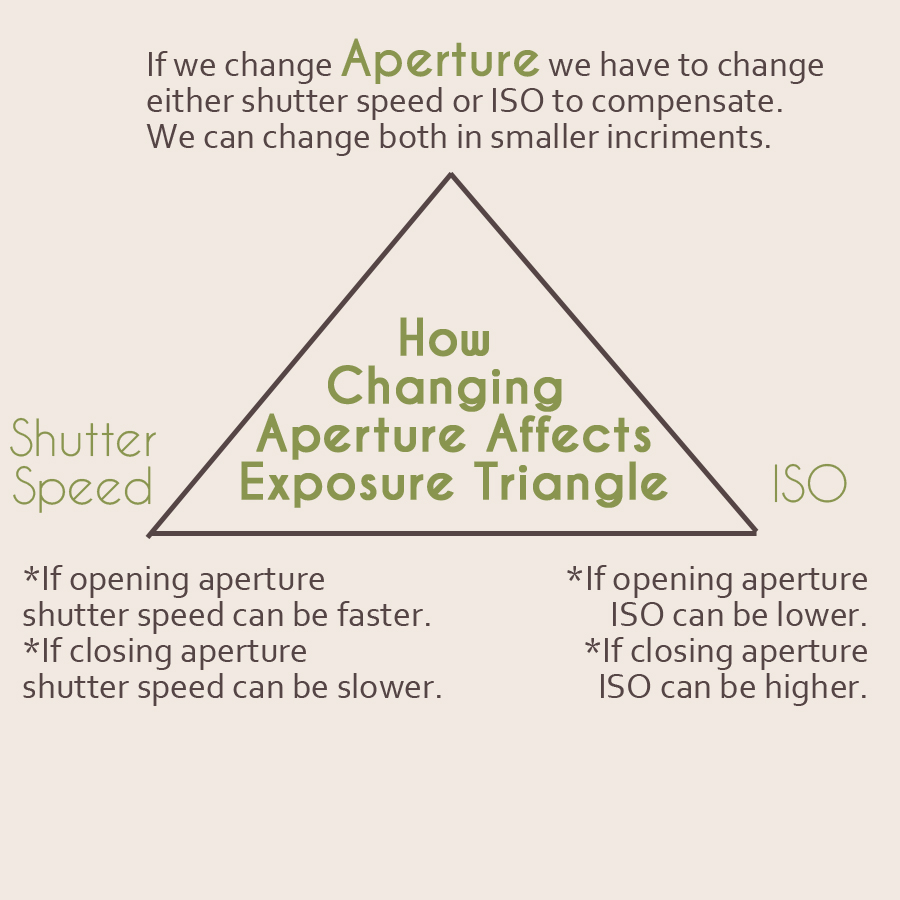
So first let’s review the three points on the Exposure Triangle and the key questions we need to ask ourselves before changing one. And (surprise!) my graphic skills are slightly better this time around. Look at how much you guys are growing me!
Relationship of the Three Points on the Exposure Triangle
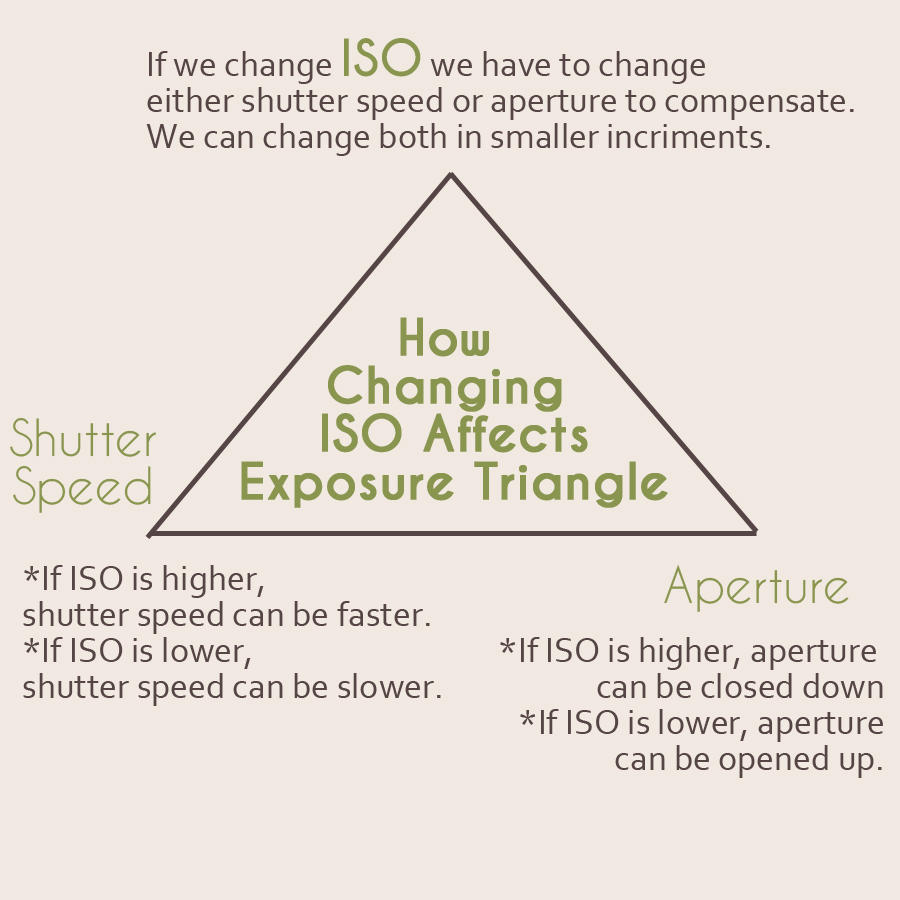
Once we have the perfect exposure set, if we change one of the points of the Exposure Triangle we will have to change at least one other point to compensate. For example, if my current perfect exposure for the scene is 1/60 second, f/5.6, ISO 100 and I want to photograph a running toddler, I should quickly realize that 1/60 is not fast enough to freeze the toddler’s motion. So I’ll change shutter speed to at least 1/100 of a second to freeze the motion. But once I’ve changed that, I’m either going to need to adjust the aperture or the ISO an equal number of stops or I’ll have to adjust both aperture and ISO to a number of stops that together equal the number of stops that I changed the shutter speed.
Confusing, huh? We’ll talk about specific stops and the more mathematical side of the Exposure Triangle next week, but this week I want to give you an idea of how changing one point on the exposure triangle is going to affect the other points on the triangle. The following is a series of graphics to help us understand these changes.
Hopefully those graphics are helpful as we learn Manual Mode. If you’d like to print a copy of these graphics, here is an Exposure Triangle Printable.
So How Do I use Manual Mode?
Whew! So that was a lot of theoretical head knowledge up there. And we’re really just starting to think about it rather than truly diving into what it means. So really this section is your challenge to read your camera manual! You’re going to have to pick up your camera manual and figure out what your adjustment dial (or dials) will do once you switch it over to manual mode. For instance, the dial on the front of my camera changes shutter speed and the one on the back of my camera changes aperture in manual mode. If I hold down the AEL button, then I can change both aperture and shutter speed together with one dial and the camera will calculate the stops for me!
Now for your pretty easy assignment.
Manual Mode Assignment #1
- Read that Camera Manual and figure out the mechanics of Manual Mode (how to use adjustment dials, where your exposure scale will appear, which button to hold down to adjust aperture and shutter speed at the same time.
- Go out and practice manipulating all points of the exposure triangle on 1-3 images.
- Here’s a rough process for these images: Set the ISO for your scene then fiddle with shutter speed/aperture according to your composition needs until your exposure scale shows that you’ve set the correct exposure for your metering mode. Take the shot. Decide whether you like the exposure on 0 and if not fiddle with moving the exposure up or down to +1 or -1.
- Don’t expect miracles this week. Your goal should simply be to understand the mechanics of shooting in Manual Mode.
- If you want to just shift your camera back to Program or one of the other Auto Modes, resist (unless you’re shooting something important like a birthday or other irreplaceable memories). Keep practicing.
That’s it for this week. If you have any specific questions about Manual Mode, get those written down in the comment section so I can address them in upcoming posts. This week is meant to be sort of a rough introduction and the assignment goes along with that. Next week we’ll cover the mathematics to get a better feel for the relationships within the exposure triangle. Don’t worry… I’m not very mathematical so it’ll be pretty easy to understand.
04
2013There are so many choices when it comes to buying lenses that it’s almost overwhelming.
We’ve studied the difference between prime (fixed focal length) and zoom lens as well as the effects that focal lengths have on images. Hopefully, you have a sense for which focal lengths compliment your style/subjects as well as whether you crave zoom or prime lenses. In this post, we’ll learn about what additional factors you should consider before purchasing a new lens.
Why Your Lens is More Important than your Camera
As I’ve mentioned before, I’ve been using a SonyAlpha 200. The camera itself is a terrible professional camera. There is noise like crazy above ISO 400, the megapixels are only slightly better than a high-end Android or Iphone camera, and there are a ton of other limitations with this beginner grade camera body.
Yet, I’m shooting pro quality images on a camera most pros would consider just above the level of junk. How? I’m using quality prime (fixed focal length) lenses. We’ve already talked about how prime lenses are sharper than even the best zoom lenses and that’s a huge part of my success with this camera body. My lenses were all bought used or “open box”, yet each of them is far better quality than any ‘kit’ lens that might come with your camera.
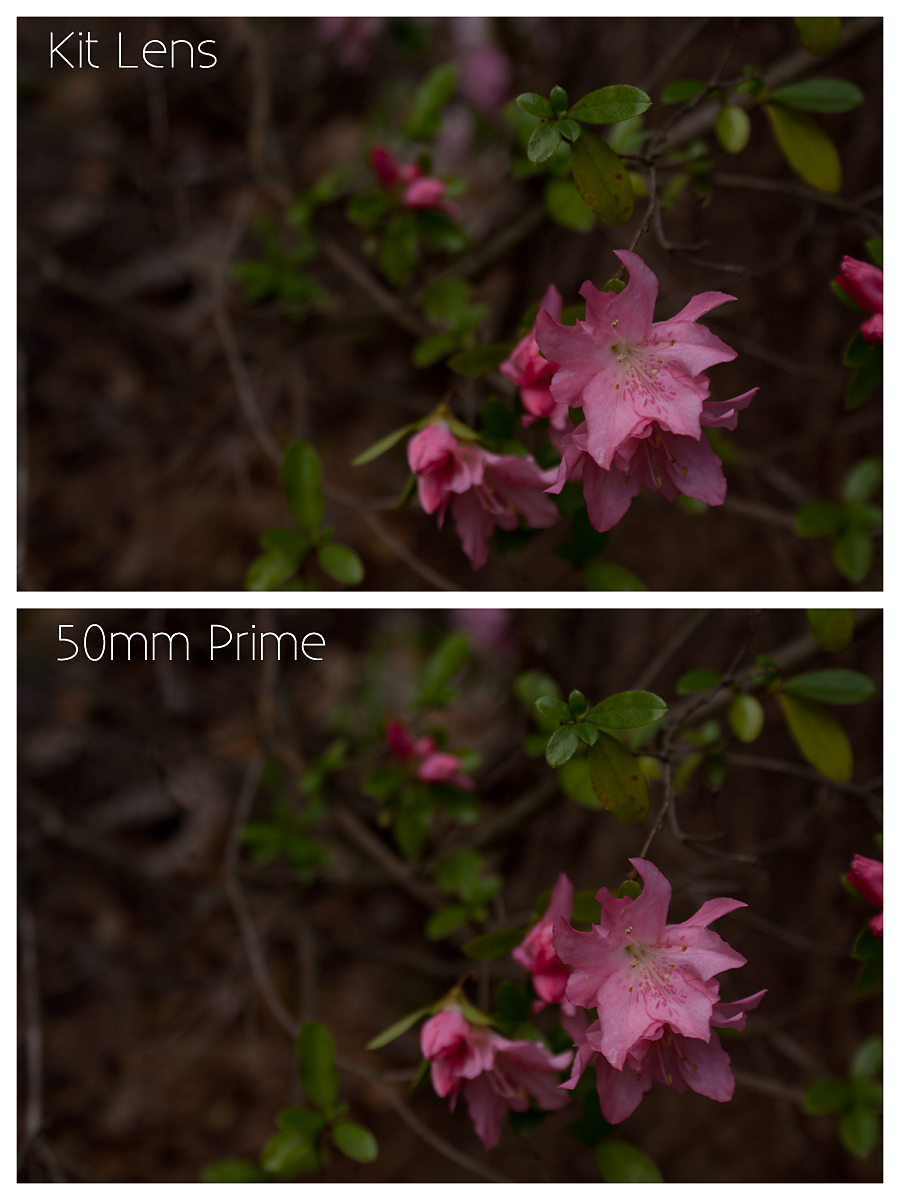
So let me dust off my kit zoom lens (f/3.2-5.6 18-70mm zoom) and shoot the same scene with it and both my primes all other settings the same and let you compare the results.
Get real close to your monitor and look at the details in these two images. Especially with that top set of leaves and the speckling on the flower petals, do you see how the bottom image has more defined borders around these small parts? Do you see the difference between the veining in those top leaves?
Let’s explore some things you want to see in your lenses to make your investment count before you consider purchasing a new one.
Why Purchase a Fast Lens?
A fast lens is one who has a very wide aperture. Remember how wider apertures let in more light? When wide open, these lenses can capture an image with a much faster shutter speed than a lens with a wide open aperture of f/4 or so.
Aperture ranges from 1.2-2.8 are generally fast lenses. On a prime lens f/1.2 to f/1.8 is pretty standard as the fastest. On a zoom lens, usually the fastest you can get is f/2.8.
Fast lenses (especially the zooms) cost a fair bit more than their slower counter parts. Why is it worth it to spend more? Because creating an aperture that opens as wide as 2.8 is a very intricate process, fast lenses generally also have quality builds, quality glass, and a larger number of elements. Finally, apertures 2.8 and greater produce the beautiful blurred background bokeh that’s so popular.
What Lenses should I Invest in First?
I’m not a know it all in this area of lenses, but there are two lenses I would recommend as your first lens purchase after your kit lens depending on both your sensor size and your primary subjects (as discussed in our lesson on focal lengths).
I would recommend a 30mm or 35mm f/1.7 to f/2.8. All of the most popular SLR manufactures have one of these right around $200-300 new. On a crop sensor this focal length is about the same as what our eyes see naturally. Objects in your images will look roughly the same size as you perceive them to be in real life. It’s great for landscapes, half or full body portraits, group shots, smaller rooms, and some macro work (depending on your lens). I use my 30mm almost exclusively for newborn and macro imagery (because my 30mm is a macro lens). Sometimes I pull it out to capture toddlers who like to be near me when I photograph them and I use it frequently in homes where I need to be closer to my subject than I prefer because of the size limitations of the room.
The second lens I would recommend is a 50mm f/1.7 or f/1.8. This lens runs from about $150-200 new. On a crop sensor this is more zoomed in than your normal vision. This is a fantastic lens for capturing details, portraits of 1-4 people, closer landscapes, and for avoiding distortion in portraits. I use my 50mm to put some distance between myself and portrait subjects most frequently (No adult wants me 2-3 feet away for a head shot… that’s just uncomfortable). However, of my two lenses it’s the faster one… so I also pull this one out whenever my lighting drop is very minimal as well as for the yummy bokeh that the f/1.7 aperture creates .
Either of these two lenses will give you a feeling for “focusing on your feet” with a prime lens as well as the difference between a fast and slow lens. Additionally, you’ll get a feel for whether you would eventually prefer a wider or more telephoto focal length; and if you love the focal length, you’ll learn that you’re willing to invest in the pricier f/1.2 or f/1.4 version of that lens.
At the end of this post I’ll feature affiliate links to these two lenses on Amazon for you to look at by your specific manufacturer. As a full disclosure: I wouldn’t recommend these lenses if I hadn’t done the research on them (or used them) and I only receive money from these links if you purchase something while on Amazon.
If you have a ton of extra cash flow or have both of the above lenses, the following are lenses are what I would recommend you researching and choosing between based on the images you most enjoy creating.
Prime Lenses:
24mm f/1.4 up to f/2.8
85mm f/1.2 up to f/2.8
90mm or 100mm Macro f/2.8
Zoom Lenses (these cost more than the average camera body! eek!):
24-70mm f/2.8
70-200 f/z.8
Where Can I get Quality Lenses?
First, here’s a handy Cheat Sheet on reading the number on your lenses before your purchase.
Next, I’d recommend staying with your camera manufacturers lenses with a few exceptions. Tamron and Sigma make pretty good zoom and fixed focus Macro lenses that are compatible with the top three (Canon, Nikon, Sony, and sometimes Olympus). Also, one of the deciding factors in purchasing Sony for me was that I could purchase extremely inexpensive and high quality used Minolta Auto Focus lenses. For Sony users this is sometimes very lucrative: I bought my 50mm f/1.7 for $50. (There’s my one and only Sony plug. Ha!).
You can purchase lenses new at a local shop (call first for availability), your camera’s manufacturer website, or Amazon.
However, I’d highly recommend shopping used especially for the 30 or 35mm or 50mm. You can often save quite a bit buying used or ‘open box’ and sacrifice very little on quality (you might find marks on the outside of the lens, for example). Some used stores even give free warranties. Stay in the like new to excellent- categories to make sure you don’t have problems. I struggle with sites like Ebay, especially if the seller is out of the country and doesn’t offer a money back guarantee. However, I have purchased from Craigslist (and would again): bring your camera and your laptop if you own one for a bigger view of the images, and meet in a public place. A little research may also find manufacturer-specific enthusiast forums with private buy/sell/trade areas and for those looking for something specific forums might be well worth the try (I just bought an a77 camera body off a Sony Specific forum!).
If you’re going used (most have new as well) online, try the following sites (not affiliate links):
What Should I look for in Buying Used?
If you’re taking the chance on a used lens not from one of these reputable sites (maybe from Ebay, Craigslist, a forum, or a personal friend), make sure to evaluate then lens as soon as you get it. Here’s a very basic list of what to look for:
- Lens outside may have some scratches or surface wear but no dings or dents which would indicate a fall.
- Nothing should rattle around inside the lens.
- Zoom lenses should zoom smoothly without catching.
- Aperture should stop down and up throughout the full range. Check images on your LCD screen after you’ve taken them. Your focusing screen will always show the wide open aperture unless you’re using a DSLT, but I’d still check on the screen even if I did have a DSLT. Better yet, upload the images to a computer to evaluate if you can.
- Front and back glass should be free from scratches or haziness on visual inspection. Some dust like spots are okay and shouldn’t effect your lens quality.
Final Thoughts On Lenses
Find what you love and use it. Some of you will find you’re a prime lens lover. Others will prefer a zoom lens. Some of you might like a little of both. That’s okay! Enjoy learning situations that call for a certain type of lens (zooms for a wedding party) or certain focal lengths (18-24mm for a very wide view).
Play with lens distortion for fun. I love this old snap of Sedryn simply because the lens distortion makes it that much more hysterical (or pitiable if you’re a more compassionate type)!
Oh, and it’s worth it to rent an expensive lens before purchasing it for yourself!
Specific Lens Recommendation Links
In alphabetic order so no particular manufacturer enthusiast gets their feelings hurt :-p (and including Pentax with the big three because one of our classmates shoots Pentax). With Canon and Nikon some lenses are only functional on a crop sensor. Most of you will do fine with that lens, but if the idea of ever upgrading to a full frame sensor camera appeals to you, do your research and order the lens compatible with a full frame camera body. I think most of the following are crop-specific lenses… but I’m not really sure.
Canon
Canon EF 35mm f/2
Canon EF 50mm f/1.8
Nikon
Nikon 35mm f/1.8G AF-S
Nikon 50mm f/1.8D AF Nikkor Lens
Nikon 50mm f/1.8G AF-S NIKKOR FX
Pentax
Pentax 21987 DA 35mm f/2.4
Pentax DA 35mm f2.8 Macro Lens
Pentax DA 50mm f1.8 lens
Sony
Sony 30mm f/2.8 Macro (I have this one)
Sony 35mm f/1.8
Sony 50mm f/1.8
Minolta 50mm f1.7 AF Lens (I have this one)
Let me know if these recommendations help you (or your spouse… hint hint) make a purchase.
